Thursday, October 10, 2013

DIY Cute Pumpkins for Halloween

We will felt a few cute pumpkins for Halloween. Our pumpkins could be great gifts for friends and family. They will look wonderful in your living room or your kitchen as signs of beautiful Autumn and approaching Halloween.


We will need some orange felting wool, a glass of water and a piece of soap, black thread and a needle. We will felt our pumpkins with water and soap so it makes sense to do it on surfaces that don't get damaged by water. A kitchen table should be a good place once it's covered with a water resistant tablecloth. You won't need too much space. The amount of water you will use is minimal.


Take a piece of orange wool and form a ball in your hands. Water your wool and add some soap to it. Now gently squeeze the piece of wool a few times. Start rolling it between your palms. Keep rolling for 5 to 10 minutes adding water and soap if needed.


Once your ball has become somewhat firm and solid rinse it well and let it dry. The goal is to make the ball not too firm so that you will be able to get a needle through it once it's dry.


Once your orange ball is dry it's time to turn it into a pumpkin. Take a black thread and a needle. Start in the middle of the orange ball adding loops around it. Six loops should be OK. At the end it makes sense to add an extra loop to serve as a hanging thread.


It's an easy DIY project that produces a great result. You will have bright and cute pumpkins made of natural materials. They could serve as small Halloween gifts for your friends.

Monday, September 30, 2013

Christmas gift ideas

We will make a Christmas gift that is an easy and simple DIY project.

We will need a wooden bracelet, a few nail polishes and a roll of masking tape. The wooden bracelet should be plain wood. Such bracelets could be purchased on-line or in craft shops. I suggest you try it on before starting a project. It would be a disappointment if once you finish painting your bracelet won't fit.


Look at your nail polish collection and select a few nail polishes that match. We will use them as our paint. They are very durable and have a nice luster. Masking tape will help us paint the pattern we design.


To start apply masking tape to the bracelet. Make sure the tape is adhered well to the wooden bracelet. Otherwise you will have paint spills and the bracelet will look messy. I will paint a pattern of stripes on my bracelet, thus, I'll apply the tape so that there are stripes of untreated wood. I'll leave 4 or 5 untreated wood stripes on my bracelet. Now color wooden stripes with the same hue of nail polish.


Once the polish is dry slowly remove the masking tape. You will see nice colored stripes on the bracelet. Now apply a new set of masking tape to color the bracelet with a new nail polish shade. Repeat as many times as nail polish colors you have. Make sure the nail polish is dry and the masking tape is adhered well.


I like to mix colors without any rule or pattern, thus, a dark red color may be followed by a golden hue and then by a dark purple one. Then I change the order. I change stripe sizes as well to make my bracelet look special and creative.


Tuesday, September 24, 2013

Nail polish wooden beads necklace

We will make a necklace of nail polish colored wooden beads. If you have a few old and dusty nail polishes don't through them away yet. You will be able to use them to make a cool looking necklace.


You will need about 20 small wooden beads with holes and a few nail polishes of matching colors. To start place a wooden bead on a wooden barbecue stick. It will be easier to color your bead that way. Start applying polish on a bead layer by layer. Once you are done with one bead move to the next one. Once all your beads are colored let them dry.

It's time now to crochet a necklace. You will need a mercerized cotton thread of a matching color and a crocheting hook. First place all the beads on the cotton thread. It will be easier to crochet your necklace that way. Start crocheting a simple row adding bead as you progress. I usually count loops so that my beads are placed at equal intervals. Once you've crocheted the necklace make a large loop on one end of it. Add a large glass bead on another end of the necklace. It will serve as a clasp.


You can wear your necklace around your neck or as a bracelet on your wrist. You can tie it around your ankle or wear it as belt. Enjoy!


Thursday, June 13, 2013

DIY how to refresh an old necklace

I've recently bought an old necklace in a vintage store. It looked pretty dull and uninspiring but I somehow liked the beads and thought I could remake it into something fresh and new.


I first disassembled the necklace and separated all the beads into three piles. I washed all the beads thoroughly in a soapy water to remove all the dust. I dried the beads on a piece of paper.


I decided not to use red beads this time as I didn't really like the original combination of charcoal grey, golden and red. I put them aside for the next project. Instead I decided to go with gray and golden beads.


I threaded all the beads in a particular pattern with two gray beads followed by one golden bead. With a regular crocheting hook I crocheted beads one by one into a necklace.


The necklace is about 40 in. long and I can wear it as one or two strings depending on my mood and my dress:).


Since the necklace is rather long I can wear it as a bracelet or a head accessory. Its neutral colors go with pretty much any dress and it works ideal with a business casual or an office outfit.


Friday, October 19, 2012

DIY How to make a Christmas tree decoration

It's about time to start thinking about Christmas gifts and home decoration ideas. If you plan on having a Christmas tree it's a great time to make an ornament for your tree with your own hands. It will be a small gift for your Christmas tree. I hand felt home decoration items and am happy to share how to create a simple Christmas tree ornament.

Christmas tree felted ornament ball

You will need a plastic ball and felting wool of different colors. For felting you will need plastic wrap paper, water and soap. To complete your ornament you will need a needle and a thread.

felting shar ball

To make the ornament cover the plastic ball with layers of white felting wool. Make a pattern you wish to have on the ball by adding small pieces of dyed wool here and there. Colors that work well for Christmas include red, green, brown. Once your wool is layered wet the ball with soapy water and cover with plastic wrap.

how to felt a christmas decoration

Start felting by pressing and caressing the wrapped ball. Be careful not to mess up the original pattern. You will always be able to fix it at the early stages of felting before the wool felts completely. Add water and soap if needed. Continue felting until the wool attaches well to the ball and all the design details are firmly felted in.

DIY felting ornament

Rinse the ball in fresh water and gently squeeze the ball to get rid of extra water. Let it dry overnight. Once your ball is nice and dry attach a thread to the ball. You can glue the thread or if you want it to be more eco friendly make a whole in the ball to let the thread through. Thus, you won't need to use any glue.

Happy crafting!

Thursday, September 20, 2012

DIY How to make felted wool mini bag

We are surrounded by bright and colorful autumn leaves and berries. Fall is such a beautiful season! It would be nice to make a vivid Fall accessory to remind us of these amazing few months. I've created this mini bag using felting wool of different colors. Red berries look a bit like bright mountain ash berries in the Fall.

My Giveaway: Red Berry felted mini bag

mountain ash red berry felted mini bag

To make a hand felted mini bag you will need white wool, water, soap and bubble wrap paper. To create a picture design on your pouch it would be great to have additional feting wool of different colors. For a strap you can always use a rope or hand crochet one of a white cotton thread.

felting white wool

As the very first step cut out a rectangular piece of bubble wrap paper. You will use the rectangular piece to create your mini bag. Depending on the desired size of your future mini bag increase the size of the cut out by about 30%. Do not forget that wool will shrink as a result of felting.

hand felting a mini bag

On a large piece of bubble wrap paper arrange pieces of white wool to form a rectangle. The size of the wool rectangle should be a bit bigger than the size of the plastic cut out. Lay out at least two layers of wool on top of each other for your mini bag to turn out firm and durable.

On top of the white wool rectangle put your plastic cut out. The wool rectangle should be slightly bigger than the cut out. You will use that extra wool to form bag's sides. On top of the plastic rectangle lay white wool. You will get a wool rectangle with a plastic cut out inside.

wet felting white woolalt=

Wet the wool with soapy water. Bend white wool on both sides and at the bottom to form a bag. Cover the wool with a large piece of bubble wrap paper and start carefully rubbing the plastic paper.

To make a picture design arrange pieces of dyed wool into a desired design and cover with a large piece of bubble wrap paper. Felt until the wool fibers attach and form a firm and homogeneous piece. Rinse your rectangular piece well and let it dry overnight.

To turn you felted rectangular piece into a mini bag attach a button or hand felted bead and a strap. To make it easy use a rope as a strap.

red berry pouch bag


Sunday, September 9, 2012

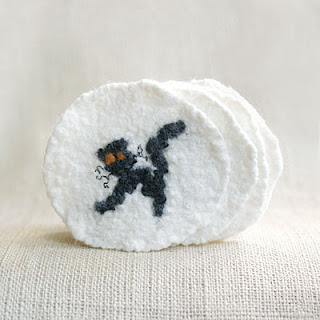
DIY How to make Halloween black cat felted coasters

It is so much fun to decorate your home for Halloween. If you have children it is even more fun as they usually love Halloween and craft projects that go with it. I have come up with an idea of making Halloween themed glass coasters. I already tried scary pumpkins. This time around I'll put a black cat on my coasters.

Halloween black cat coasters

To make felted wool coasters we will need white, black and orange felting wool, water, soap and bubble wrap plastic paper.

On a piece of bubble wrap plastic paper arrange pieces of white felting wool so that they form a circle. You can put one layer of wool for future coasters to be thin or a few layers for them to be thicker. Don't forget that wool will shrink by about 30%. Depending on the size of future coasters add 30% to their original size.

Halloween black cat felting

Once the white circle is there start working on a black cat. Let one piece of black wool be the cat's tail, another - its back. Form a circle out of black wool and make the cat's head. Decorate your cat with additional features like orange eyes, whiskers made of black thread, etc. Use your imagination to make your cat funny, scary or cute! It's important you arrange all the details carefully so that they don't mix up later on.


Once the cat is ready start felting. To felt add soapy water and cover the wool with another layer of bubbled wrap paper. Make sure the original image of the black cat stays as much intact as possible. Start carefully rubbing the plastic paper. Felting shouldn't take long. Once all the wool fibers attach to each other the coaster is ready.


Rinse your coasters well and let them dry overnight. If you wish to make more that one coaster keep in mind that it's almost impossible to completely replicate your original image. You can more or less follow the steps of replicating your original design but at the end all cats will look different. If you love handmade and are ready for all your cats to look special and different go for it!


Friday, September 7, 2012

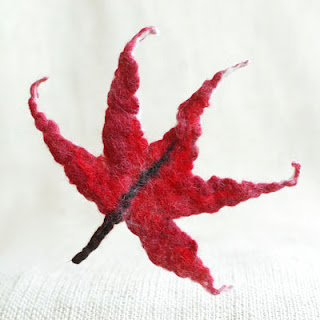
DIY How to make a maple leaf brooch

Let us make a felted brooch in a shape of a maple tree leaf. Autumn will be here before we know it. Fall inspired accessories will look great on our coats and outerwear. The maple leaf brooch is relatively easy to make. You will need a table to put a piece of bubbled wrap paper. It's great if the table's surface can endure water and soap as with felting you will get your table wet.

Red maple leaf

You will need felting wool in red, burgundy and brown. For felting you will need soap, water and bubbled wrap paper.

red burgundy felting wool

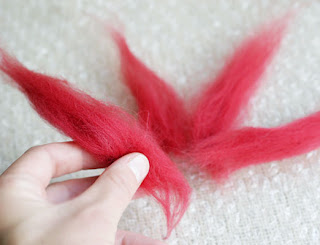
On a piece of bubbles paper arrange five pieces of burgundy red felting wool. They will be our maple leaves. In the middle add a piece of brown wool. To add color put a few small pieces of bright red wool here and there. I suggest you experiment with colors and add a bit of green, black, dark brown or ever blue. Colors will add volume to the leaf and make it look bright.

felting red maple leaf

Once the leaf is arranged wet it with soapy water and cover with another piece of bubbled wrap. Start gently rubbing the plastic paper. The leaf is felted when all the wool fibers stay intact and attached to each other.

Hand felted red maple leaf

The brooch is almost ready. Rinse it well in water and let it dry. Attach a safe pin at the back of the leaf to turn it into a brooch. You can wear this brooch with pretty much any outfit. It will look great on winter coats and outerwear.

red burgundy maple leaf brooch


Sunday, September 2, 2012

DIY How to make Halloween ghost home decoration

Some of us will most probably decorate our homes for Halloween. I would like to share an idea of a DIY project of making felted ghosts for Halloween.


We will need white and black felting wool, a glass to use as a form, soap, water and a piece of bubbled wrap paper.


On a piece of bubbled wrap paper put an empty glass upside down. Slowly start to cover it with white wool. It makes sense to water the surface of the glass beforehand so that our pieces of wool could stick to it. Once the glass is all covered with wool it's time to wet our wool with soapy water. It makes sense to water it slowly so that our wool doesn't fall off the glass and stays there covering it nicely. Once white wool is wet we can start making our ghost's "face".


With a piece of black wool make an eye and attach it to our white ghost. It's much fun to experiment with sized and eye position as our ghost's face expression will change dramatically depending on what shape and size ghost's eyes will be.

Once all the wool pieces are at place we can start the felting process. Carefully wrap bubbled paper around our glass and start rubbing it. Be gentle so that our wool doesn't fall off the glass. Once wool fibers become inseparable and our white form turns into a firm piece of felted wool it's time to rinse it.

To dry it well I let it sit on a glass overnight. Thus, the original form of the glass will be preserved and whet our ghost is nice and dry it will stay firm and round. I've attached a thread on top of it so that I could hang it anywhere in my room or outside. My little white ghost turned out to be not scary at all. But it's all in your own hands. Designing the ghosts face is the most creative part of the whole process!