I still have some buttons left from my crocheting adventure. I don’t like nice items to rest idle on my working table in my studio so I came up with an idea of a felted bracelet with buttons.
To make the bracelet we will need undyed felting wool, buttons of different colors and sizes, bubble plastic wrap, a needle and a white thread.

I first started with felting a bracelet. If you don't feel like felting today you can always buy a prefelted wool in any of craft and supplies stores. If you decide to go with a prefelted piece just cut a rectangle shaped piece out of a prefelted wool. The measurements could be about 2 and ½ inch by 9 and ½ inch.

I prefer to felt a bracelet myself as, thus, I’m able to make it as soft and thin as I wish.
On a bubble wrap piece of paper I lay out pieces of wool to form a rectangle. The rectangle will later turn into the bracelet. Since the wool will shrink I make the rectangle about 30% bigger that the original size. I’ll go with about 3 and ½ inch by 12 inch shape this time.

Once the rectangle is formed I wet it with clear water and add soap. Liquid soap should be fine. Once the piece is all wet and soapy I cover it with the rest of bubble plastic paper and start the process of felting. I stroke and rub the plastic helping wool fibers to bind and felt. When the wool has felted I rinse my bracelet in clear water and let it dry completely.

On my bracelet I lay out buttons of different sizes and colors. I can color coordinate them and add some extra buttons here and there for the pattern to look the way I want it to be.
I sew on buttons one by one with a needle and white thread. It makes sense to sew largest buttons first. It will help you preserve the original pattern and distribute buttons evenly on the bracelet.

Once all the buttons are on the bracelet it’s time to make a snap. One of the buttons can easily be used as a snap. Just make a cut on the opposite side of the bracelet for the button to fit in.
The bracelet looks bright and unique! It can be a great gift for someone who loves buttons. One can always substitute simple buttons with vintage ones or use dyed wool instead of white one as a base.
Happy crafting!

Monday, June 4, 2012
GIY Tutorial How to make felted bracelet with buttons
Monday, May 21, 2012
DIY How to make felted watermelon earrings
To make bright and happy summer inspired watermelon earrings we will need felting wool in bright red, green, white and black, soap, pure water and bubbled wrap paper.

To make a watermelon we will need to lay out wool in a shape of “hot dog”. First we cut a piece of red wool of about 5 inch. We mix red wood with a bit of black wool to make it look like our watermelon has seeds. On top of red wool we lay white and than green wool. As a result we will have a green wool “hot dog” that inside will have red, black and white wool.

Once our “hot dog” is formed we wet is with water and soak it in soap. As it gets wet and soapy we start rolling in on a piece of bubbled wrap. We roll it on a plastic wrap for about 15 minutes until it gets firm. The wool will shrink by about 30%. Let our felted piece dry well.

Our next step will be to cup our “hot dog” into equal parts. You can cut it with scissors. As a result we will get round pieces of felted wool that will look like freshly cut watermelon. If you attach pieces of felted watermelon to simple earrings hooks you will get nice and fresh watermelon earrings.

The watermelon earrings look fun and bright. They will be a truly hand made item as I doubt you can buy anything like that in a jewelry store. The fact that you've created them with your own hands will make watermelon earring even more special.

Saturday, July 2, 2011
Summer Wedding Essentials contest results
Russian Artists team on Etsy just had its Summer Wedding Essentials contest. Fifty six team shops took part in the contest submitting their hand made wedding-themed items. All of the entries were fantastic! They can be checked out at Russian Artists Facebook Page.
Although all of the items submitted were amazingly beautiful, creative and unique, I picked up a few of my personal favorites. All of the wonderful items presented will make any wedding an unforgettable experience!
1. Dog Crochet Wedding Floral Collar by mailo
2. Event Decor for the Wine Glass by MamaTita
3. Tea Set, Original decorative painting by Yury Tarler
4. White earrings with pearls by HoneyCase2
Saturday, June 25, 2011
Tutorial How to make hand crocheted necklace with buttons
I've recently came across a large bag of multicolored buttons in a crafts store and just could not stop myself from buying one. The buttons are of different sizes, shapes and hues of blue and green. They are great for a hand crocheted summer necklace. 
To make a necklace we will need a mercerized cotton thread, a toggle clasp, a crochet hook and about 30 buttons of different sizes and colors. To make crocheting simple and to safe us some time we will start with beading all out buttons on a thread first. Once all our buttons are ganging there nicely we can start crocheting.
I'll crochet a simple foundation chain adding buttons with 1 or 1 and 1/2 inch. intervals. In case you would like to make your necklace longer you can add some more buttons or make a space between them larger. I like to mix and match hues of green and blue so that the necklace looks unique and stylish. 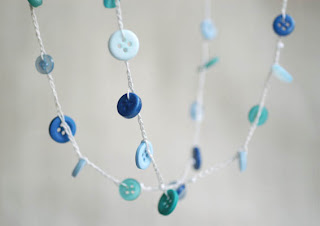
I plan on crocheting 34 inch. necklace so that I could wear it either on my neck or my arm. Some people wear crocheted necklaces on their waist instead of a belt or on their ancle.
The necklace crocheting shouldn't take more than 15 minutes. When the thread is ready we will attach toggle clasp to it and our summer bright necklace is ready to wear. It's a perfect summer accessory and will make you look beautiful and special!
Friday, May 27, 2011
Flower brooch hand dyed in burgundy
I keep experimenting with hand dyeing. It's such a rewarding and inspiring process. So many new ideas come to life when one starts mixing colors. The end result is always a surprise and the whole process is much fun!
I hand felted many many wool petals for my flower brooches and dyed them in my freshest color mix. The final dye color is more like a burgundy with hints of red and even yellow. It's such an interesting color that is not eye popping bright but rather stylish and elegant.
I've assembled my petals into a flower brooch with a hand crocheted jute base that I had made earlier. The brooch looks like a flower and will no doubt decorate any outfit. It will go well with any office neutral colors especially the ones with hues of light green, dusty pink and pale blue.
Tuesday, March 1, 2011
How to hand dye a flower felted brooch
I continue experimenting with hand dyeing and food coloring. The results are always beautiful and rewarding. To hand dye a felted wool brooch we will need one pack of KoolAid or a similar powder and white hand felted brooch layers. You can read about creating hand felted brooches in my post on How to make felted wool flower brooch
To prepare coloring I mix one tea spoon of powder with a little bit of water in a plastic container. It sometimes makes sense to prepare a few containers with slightly different coloring. You may go with strawberry and cherry for example.
When the coloring solution is ready gently apply color to each layer of the brooch puring it from a tea spoon. I usually start in the middle leaving the edges of the layer intact. It makes sense to use a plastic tray to protect your surfaces and the coloring is quite intense. When all three layers are dyed it's time to put them into a microwave. I normally microwave the whole set for a few minutes. The goal is not to burn the wool. Microwaving helps the wool to absorb the dye. The color will now stay on the fiber.
When the layers are ready I let them dry over night. With hand dyeing one has so much freedom! It's up to you how to apply the color and where to apply it. One can make the brooch bright and vivid by applying concentrated coloring or pale and light by applying just a few drops of color. The final stage of our process is to actually assmeble the brooch. You can use a hand felted bead, a button or a glass bead to attach in the missle of the brooch. I personally like large felted beads as they make my brooches look more like flowers!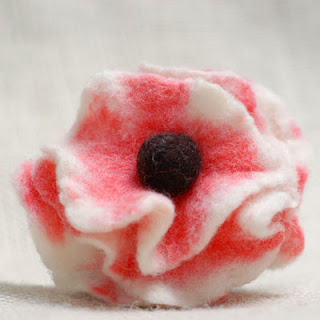
I will definitely continue experimenting with food coloring. My next project is to start mixing different colors! Stay tuned!
Thursday, February 24, 2011
Hand crafting at home
Hand crafting is a great way to relieve stress and to spend some time creating unique and beautiful art pieces. The result usually looks amazing and all the relatives and friends end up catching the same crafting bug. Be it crocheting, felting, beading or yarn hand spunning it will all make you happy and feel a real artists and craftsman.
We all have spare supplies of buttons, glass and plastic beads, yarn and threads in our homes. They are stuck somewhere in the basement or deep inside our closets.
I encourage you to go and find them! You will be amazed by all the treasures you find in your house!
When I was small I loved to sort my mom's buttons she inherited from her granny. They were so shiny and colorful, of different shapes and sizes! I loved the glass buttons the most. In the sun the light would go through them and make everything around shine! Look for a few glass beads and buttons in your house! You might find some vintage pieces that are priceless!
After you dig out all the treasures it's time to start crafting. Every person is different. Some like the feel and touch of yarn and fiber and, thus, enjoy knitting, crocheting and yarn spinning. Some like vivid and bright colors of beads and are eager to spend hours beading and wire wrapping. It's actually fun to try everything possible craft and technique as you never know what you fall in love with at the end.
The result of hand crafting will always be unique and rewarding. It's such a joy to end up with a beautiful necklace or a cool hand knitted scarf.
I beg you not to waste your spare time at home! An hour or two of crocheting and beading will make you feel better! I promise!:)
I was myself inspired by an example of Ira Rott who has recently made her first hand spun yarn. It's an exciting process you should definitely try! It’s next on my personal list of home crafting techniques.

