
Pictures of my felted scarves are available at my Instagram
My ETSY online shop offers a wide selection of felted scarves. I'll be happy to answer any of your questions.
More pictures any information are available at my Tonya Utkina Facebook page.
I'm hosting my new giveaway. One lucky giveaway participant selected by a random number generator will win a set of eight hand felted red ornament balls of different sizes. Each red felted ball has a thread and could be an ideal Christmas tree decoration. To read more about hand felted Christmas balls please go to my CityCrochet shop.

The giveaway's last day is Tuesday, December 11th.
To enter: Please visit my CityCrochet shop and leave a comment below about any item(s) you really like. Don't forget to leave your contact information (e-mail address, Facebook, Twitter, Pinterest) so I can contact you in case you win. Your info will NEVER be used for any other purposes!!!
Extra entries: Please leave one separate comment for each extra entry following the instructions below.
Open to US and Canada only. Winner will be chosen by online random generator. The winner has 3 days to reply or another winner will be chosen.
Good luck!:)
a Rafflecopter giveaway

I'm hosting my new giveaway. One lucky giveaway participant selected by a random number generator will win a set of five hand felted white acorns with real acorn tops. Each acorn has a thread and could be an ideal Christmas tree ornament. To read more about acorns please go to my CityCrochet shop.
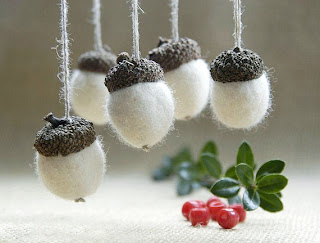
The giveaway ends on Friday, November 2nd. The winner will be announced on Monday, November 5th.
To enter:
Please visit my CityCrochet shop and leave a comment below about any item(s) you really like. Don't forget to leave your contact information (e-mail address, Facebook, Twitter, Pinterest) so I can contact you in case you win. Your info will NEVER be used for any other purposes!!!
Extra entries: Please leave one separate comment for each extra entry following the instructions below.
Open to US and Canada only. Winner will be chosen by online random generator. Winner will be notified by Monday, November 5th and will have 3 days to reply or another winner will be chosen.
Good luck!:)
a Rafflecopter giveaway

Red maple leaf felted mini bag GIVEAWAY ended on Friday, October 12th. Thank you so much for participating! I very much appreciate your time and attention!

Congratulations to Marty for winning my giveaway!!!

From time to time I come across amazing artists who make unique and special hand made items. This time bright and colorful birds of different shapes and sizes caught my eye. They are so happy and positive that it's impossible to ignore them. Colorful birdies turned out to be felted brooches created by a talented artist Marina of Moloco.

Can you tell us a bit about yourself?
My name is Marina and I'm from Kiev, Ukraine. I work as an architect and designer but my true passion is hand making. I sew and stitch in my spare time creating different accessories out of natural fibers. To decorate I add embroidery of my own design.

I've been creating my little birds for some time now and have accumulated many birds of different designs and colors. At some point I've decided I have to share all my little birdies with the world and opened my own on-line shop. My birds are for people who love and appreciate unique handmade things just as I appreciate handmade creations by so many talented artists around me.

Many items that surround us in our everyday life inspire me. I find my inspiration in architecture, landscapes, beautiful interiors and traditional embroidery.
My favorite fibers are felt, wood and cotton. Natural fibers are the best to work with. They are so pleasant to touch and beautiful to look at!


Red Berry felted mini bag GIVEAWAY ended on Friday, September 28th.
Thank you so much for participating! I very much appreciate your time and attention!
I ran the number of comments through the Random Generator website

Let us congratulate Marija who won my Red Berry felted mini bag with a button and a long strap!
Congratulations Marija!!!

I felt a lot of scarves, bags, brooches and, thus, I have a huge bag of wool scraps. The bag sits on my shelf. It's not heavy but takes a lot of my space! To somehow use all these bright and cool scraps I came up with an idea to turn them into felted wool brooches. Scraps will serve as an organic filler to make my brooches nice and puffy.

I have many scraps of different colors as I felt scarves in different techniques using different types of felting wool. Wool scraps are very nice to touch and they are totally eco friendly. I first decided to separate them into small piles by their color.

To make a wool felted brooch I cover a handful of wool scraps with felting wool and felt it in soapy warm water. As a result I get a base for my brooch that pretty much looks like a white pebble stone.

Once the brooch base is ready, I let it dry. Now it's time to turn it into something unique and beautiful. I embroidered a tree of life design adding small glass beads in blue, red and green. It's a great opportunity to use your imagination and come up with something totally different and special!


To celebrate this beautiful autumn I'm hosting my first giveaway this year. One lucky giveaway participant selected by True Random Number Generator will win my hand felted Red Berry mini bag. I hand felted this mini bag of wool in white, red, burgundy, green and brown. No glues, dyes or artificial materials were used. To read more about the mini bag please go to my CityCrochet shop.

The winner will be announced next Friday, September 28th.
To enter:
Please visit my CityCrochet shop and leave a comment here about any item(s) you really like. Don't forget to leave
your contact information (e-mail address, Facebook, Twitter, Pinterest) so I can contact you in case you win. Your info will NEVER be used for any other purposes!!!
Extra entries:
Please leave one separate comment for each extra entry. (So if it is 2 extra entries for example, please leave 2 comments, etc.)
1 entry - follow my blog with Google friend connect
1 entry - Like my Facebook page
1 entry - Like this post (just press the Like button under this post)
1 entry - follow me on Twitter TonyaUtkina
1 entry - follow me on Pinterest
1 entry - repin this post (just press "Pin It" button under this post)
2 entries - grab my button and put it on your blog
No purchase is neccessary, but if you happen to buy something from my shop you will get extra 5 entries.
Open to US and Canada only. Winner will be chosen by online random generator. Winner will be notified by Friday, September 29th and will have 3 days to reply or another winner will be chosen.
Good luck!:)

We are surrounded by bright and colorful autumn leaves and berries. Fall is such a beautiful season! It would be nice to make a vivid Fall accessory to remind us of these amazing few months. I've created this mini bag using felting wool of different colors. Red berries look a bit like bright mountain ash berries in the Fall.
My Giveaway: Red Berry felted mini bag

To make a hand felted mini bag you will need white wool, water, soap and bubble wrap paper. To create a picture design on your pouch it would be great to have additional feting wool of different colors. For a strap you can always use a rope or hand crochet one of a white cotton thread.

As the very first step cut out a rectangular piece of bubble wrap paper. You will use the rectangular piece to create your mini bag. Depending on the desired size of your future mini bag increase the size of the cut out by about 30%. Do not forget that wool will shrink as a result of felting.

On a large piece of bubble wrap paper arrange pieces of white wool to form a rectangle. The size of the wool rectangle should be a bit bigger than the size of the plastic cut out. Lay out at least two layers of wool on top of each other for your mini bag to turn out firm and durable.
On top of the white wool rectangle put your plastic cut out. The wool rectangle should be slightly bigger than the cut out. You will use that extra wool to form bag's sides. On top of the plastic rectangle lay white wool. You will get a wool rectangle with a plastic cut out inside.

Wet the wool with soapy water. Bend white wool on both sides and at the bottom to form a bag. Cover the wool with a large piece of bubble wrap paper and start carefully rubbing the plastic paper.
To make a picture design arrange pieces of dyed wool into a desired design and cover with a large piece of bubble wrap paper. Felt until the wool fibers attach and form a firm and homogeneous piece. Rinse your rectangular piece well and let it dry overnight.
To turn you felted rectangular piece into a mini bag attach a button or hand felted bead and a strap. To make it easy use a rope as a strap.


Some of us will most probably decorate our homes for Halloween. I would like to share an idea of a DIY project of making felted ghosts for Halloween.

We will need white and black felting wool, a glass to use as a form, soap, water and a piece of bubbled wrap paper.

On a piece of bubbled wrap paper put an empty glass upside down. Slowly start to cover it with white wool. It makes sense to water the surface of the glass beforehand so that our pieces of wool could stick to it. Once the glass is all covered with wool it's time to wet our wool with soapy water. It makes sense to water it slowly so that our wool doesn't fall off the glass and stays there covering it nicely. Once white wool is wet we can start making our ghost's "face".

With a piece of black wool make an eye and attach it to our white ghost. It's much fun to experiment with sized and eye position as our ghost's face expression will change dramatically depending on what shape and size ghost's eyes will be.
Once all the wool pieces are at place we can start the felting process. Carefully wrap bubbled paper around our glass and start rubbing it. Be gentle so that our wool doesn't fall off the glass. Once wool fibers become inseparable and our white form turns into a firm piece of felted wool it's time to rinse it.
To dry it well I let it sit on a glass overnight. Thus, the original form of the glass will be preserved and whet our ghost is nice and dry it will stay firm and round. I've attached a thread on top of it so that I could hang it anywhere in my room or outside. My little white ghost turned out to be not scary at all. But it's all in your own hands. Designing the ghosts face is the most creative part of the whole process!


Since we moved to US Halloween has become one of our favorite holidays. It's so much fun to dress up, decorate our home and invite guests on Halloween. As usual we will make a few Halloween family projects to decorate our house.
I would like to share a simple project that could be accomplished either by one person or a whole family. This time we will make Halloween themed pumpkin coasters that will add color to our house and make it ready for the holidays. Children will no doubt have fun making funny pumpkins with scary faces.

We will need white and black felting wool, water, soap and bubbled wrap paper. If you have orange felting wool it's even better as in that case we won't have to dye it.

To start our project we have to lay down pieces of white (orange) wool on a large piece of bubbled wrap paper. Bubbles on the paper should face up. In order for our coasters to be round we should try to form a circle out of our pieces of wool. As a result of felting our wool will shrink by about 30%. Keep it in mind! We will have to make our circles about 30% larger than the original size we want them to be.
We can put as many layers of wool as we want. More layers are there thicker the coasters will be.

With pieces of black wool we form a small circle and place it on our white wool. It will be our pumpkin's eye. It's time to unleash your creativity! You can make your pumpkin look funny, happy or scary by making eyes of different shapes and sizes. The same is true for a mouth. We can make it happy or sad.
As soon as the pumpkin's face is ready we can carefully wet and soap it. Make sure the face expression doesn't alter or we will not be able to fix it later. Once the wool is wet we can start felting by rubbing the paper. In the process of felting individual wool fibers will adhere forming a firm piece. We continue felting adding water and soap as needed. The process is completed when individual wool fibers are stuck and we are unable to separate them. It's time to rinse our project and let it dry.

If you originally used white wool it's time to dye it in orange so that our pumpkin looks like a true Halloween creature!
To dye our coaster I used orange KoolAid. In a plastic tray suitable for use in a microwave I mixed water and orange KoolAid. I put my white coaster in the orange solution and kept it in the microwave until it boiled. Be careful handling the tray as it's very hot! Your coaster now is nice and orange. Let it cool and when it's cool rinse it and let it dry. Your orange pumpkin coaster is ready!


We all get inspired by beautiful flowers. In spring and summer with so many flowers in bloom we get positive energy just by stepping out into a garden or walking in a park. It’s somewhat harder to find flowers in winter though. I’ve recently came across an amazing artists Elena who makes exotic and beautiful felted flowers. She helps us stay surrounded by flowers during cold winter days.
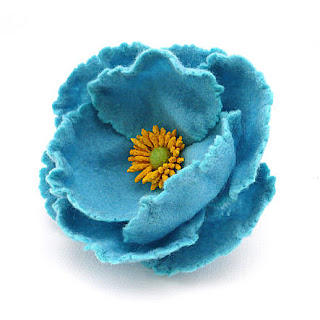
Can you tell us a bit about yourself?
My name is Elena and I live in a beautiful city of Naberezhnye Chelny, Russia. I love flowers, nature and bright colors. Our nature is some what reserved and we don’t have exotic flowers and plants growing in our gardens and forests. Felting unique looking flowers is a way for me to compensate for the luck of nature diversity and complexity.

How did you start?
It all started with my daughter Tatiana once coming across a felted purse tutorial on the Internet. The idea of felting a purse was quite inspiring and we ended up making one. That’s how I started hand felting.
Russian traditions of felting date back centuries and these days there are a lot of books and tutorials on how to felt pretty much anything. After experimenting with making a purse and other items I tried to make a flower. The process absorbed me completely and I make mostly flowers ever since.
I felt pretty much every day and experiment with felting a lot. I’ve come up with my own technique of felting flowers so that fluffy wool turns into smooth and soft yet firm flower petals. I try to make my flowers look real and the only thing that makes them different is a lack a scent.

What inspires you?
My family supports and inspires me in everything and I’m very thankful for that. My mom is my most authoritative critic – if she does not like the flower, I will remake it.
Nature and flowers are great sources of inspiration for me. I experiment with felting a lot and new techniques and fibers offer new possibilities and let me create different and unique items. On top of wool silk is another fiber that is great for felting. Mixing wool and silk I make interesting textures that become exotic flowers.

What are your creative plans for the future?
I wish there were more that 24 hours in one day! I plan on writing a master class for flower felting. People are often curious to learn how I make my petals and stamens that look like real. I’ve been experimenting a lot with felting to get to the point where my felted flowers look fresh and live. I’ll be happy to share my knowledge with other felt loving artists.
Thank you, Elena

To make bright and happy summer inspired watermelon earrings we will need felting wool in bright red, green, white and black, soap, pure water and bubbled wrap paper.


