Thursday, October 10, 2013

DIY Cute Pumpkins for Halloween

We will felt a few cute pumpkins for Halloween. Our pumpkins could be great gifts for friends and family. They will look wonderful in your living room or your kitchen as signs of beautiful Autumn and approaching Halloween.


We will need some orange felting wool, a glass of water and a piece of soap, black thread and a needle. We will felt our pumpkins with water and soap so it makes sense to do it on surfaces that don't get damaged by water. A kitchen table should be a good place once it's covered with a water resistant tablecloth. You won't need too much space. The amount of water you will use is minimal.


Take a piece of orange wool and form a ball in your hands. Water your wool and add some soap to it. Now gently squeeze the piece of wool a few times. Start rolling it between your palms. Keep rolling for 5 to 10 minutes adding water and soap if needed.


Once your ball has become somewhat firm and solid rinse it well and let it dry. The goal is to make the ball not too firm so that you will be able to get a needle through it once it's dry.


Once your orange ball is dry it's time to turn it into a pumpkin. Take a black thread and a needle. Start in the middle of the orange ball adding loops around it. Six loops should be OK. At the end it makes sense to add an extra loop to serve as a hanging thread.


It's an easy DIY project that produces a great result. You will have bright and cute pumpkins made of natural materials. They could serve as small Halloween gifts for your friends.

Sunday, September 9, 2012

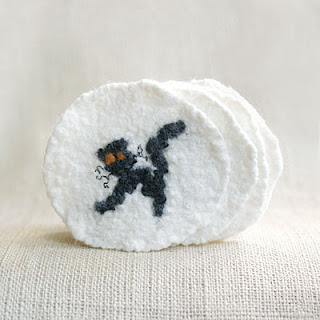
DIY How to make Halloween black cat felted coasters

It is so much fun to decorate your home for Halloween. If you have children it is even more fun as they usually love Halloween and craft projects that go with it. I have come up with an idea of making Halloween themed glass coasters. I already tried scary pumpkins. This time around I'll put a black cat on my coasters.

Halloween black cat coasters

To make felted wool coasters we will need white, black and orange felting wool, water, soap and bubble wrap plastic paper.

On a piece of bubble wrap plastic paper arrange pieces of white felting wool so that they form a circle. You can put one layer of wool for future coasters to be thin or a few layers for them to be thicker. Don't forget that wool will shrink by about 30%. Depending on the size of future coasters add 30% to their original size.

Halloween black cat felting

Once the white circle is there start working on a black cat. Let one piece of black wool be the cat's tail, another - its back. Form a circle out of black wool and make the cat's head. Decorate your cat with additional features like orange eyes, whiskers made of black thread, etc. Use your imagination to make your cat funny, scary or cute! It's important you arrange all the details carefully so that they don't mix up later on.


Once the cat is ready start felting. To felt add soapy water and cover the wool with another layer of bubbled wrap paper. Make sure the original image of the black cat stays as much intact as possible. Start carefully rubbing the plastic paper. Felting shouldn't take long. Once all the wool fibers attach to each other the coaster is ready.


Rinse your coasters well and let them dry overnight. If you wish to make more that one coaster keep in mind that it's almost impossible to completely replicate your original image. You can more or less follow the steps of replicating your original design but at the end all cats will look different. If you love handmade and are ready for all your cats to look special and different go for it!


Sunday, September 2, 2012

DIY How to make Halloween ghost home decoration

Some of us will most probably decorate our homes for Halloween. I would like to share an idea of a DIY project of making felted ghosts for Halloween.


We will need white and black felting wool, a glass to use as a form, soap, water and a piece of bubbled wrap paper.


On a piece of bubbled wrap paper put an empty glass upside down. Slowly start to cover it with white wool. It makes sense to water the surface of the glass beforehand so that our pieces of wool could stick to it. Once the glass is all covered with wool it's time to wet our wool with soapy water. It makes sense to water it slowly so that our wool doesn't fall off the glass and stays there covering it nicely. Once white wool is wet we can start making our ghost's "face".


With a piece of black wool make an eye and attach it to our white ghost. It's much fun to experiment with sized and eye position as our ghost's face expression will change dramatically depending on what shape and size ghost's eyes will be.

Once all the wool pieces are at place we can start the felting process. Carefully wrap bubbled paper around our glass and start rubbing it. Be gentle so that our wool doesn't fall off the glass. Once wool fibers become inseparable and our white form turns into a firm piece of felted wool it's time to rinse it.

To dry it well I let it sit on a glass overnight. Thus, the original form of the glass will be preserved and whet our ghost is nice and dry it will stay firm and round. I've attached a thread on top of it so that I could hang it anywhere in my room or outside. My little white ghost turned out to be not scary at all. But it's all in your own hands. Designing the ghosts face is the most creative part of the whole process!


Thursday, August 30, 2012

DIY How to make felted Halloween coaters

Since we moved to US Halloween has become one of our favorite holidays. It's so much fun to dress up, decorate our home and invite guests on Halloween. As usual we will make a few Halloween family projects to decorate our house.

I would like to share a simple project that could be accomplished either by one person or a whole family. This time we will make Halloween themed pumpkin coasters that will add color to our house and make it ready for the holidays. Children will no doubt have fun making funny pumpkins with scary faces.


We will need white and black felting wool, water, soap and bubbled wrap paper. If you have orange felting wool it's even better as in that case we won't have to dye it.


To start our project we have to lay down pieces of white (orange) wool on a large piece of bubbled wrap paper. Bubbles on the paper should face up. In order for our coasters to be round we should try to form a circle out of our pieces of wool. As a result of felting our wool will shrink by about 30%. Keep it in mind! We will have to make our circles about 30% larger than the original size we want them to be. We can put as many layers of wool as we want. More layers are there thicker the coasters will be.


With pieces of black wool we form a small circle and place it on our white wool. It will be our pumpkin's eye. It's time to unleash your creativity! You can make your pumpkin look funny, happy or scary by making eyes of different shapes and sizes. The same is true for a mouth. We can make it happy or sad.

As soon as the pumpkin's face is ready we can carefully wet and soap it. Make sure the face expression doesn't alter or we will not be able to fix it later. Once the wool is wet we can start felting by rubbing the paper. In the process of felting individual wool fibers will adhere forming a firm piece. We continue felting adding water and soap as needed. The process is completed when individual wool fibers are stuck and we are unable to separate them. It's time to rinse our project and let it dry.


If you originally used white wool it's time to dye it in orange so that our pumpkin looks like a true Halloween creature! To dye our coaster I used orange KoolAid. In a plastic tray suitable for use in a microwave I mixed water and orange KoolAid. I put my white coaster in the orange solution and kept it in the microwave until it boiled. Be careful handling the tray as it's very hot! Your coaster now is nice and orange. Let it cool and when it's cool rinse it and let it dry. Your orange pumpkin coaster is ready!


Thursday, October 14, 2010

Halloween countdown gifts on Etsy

It's Halloween countdown and we already started decorating our house for the upcoming holiday. My kids are very excited and a bit frightened by all the spiders and witches hanging on our neighbors' doors. It's a lovely holiday and so much fun for both kids and grown-ups. I picked up a few nice Halloween gift and decoration ideas on Etsy to share with everyone looking forward to this great holiday!
halloween countdown
I featured the following wonderful Etsy artists in my collection:
CheekieBottoms, FleetingStillness, KarisaGraphic, YuliaKazansky, TonyaUtkina, bumblestore, honeypunk1, TomBjornDesigns, FineEmbroidery, ArtHarmony, socksandmittens, CityCrochet, cushyadornments, katrinshine, graphicland, CuffeShop

Thursday, October 7, 2010

GIVEAWAY: Red Berry Earrings

Fall is a lovely season with so much vivid and beautiful colors around us. It will be followed by a rather colorless winter so let's enjoy this feast of color while it lasts! I handmade this juicy Red Berry earrings of bright Czech glass and silver plated wire. They are absolutely unique and each piece is carefully crafted in an eco-friendly and inspiring surroundings.red berry earrings
I'm hosting my first Fall giveaway! One lucky giveaway participant selected by True Random Number Generator will win my handmade Red Berry earrings next Thursday, October 14, 2010.

To enter:


Please visit my Etsy shop TonyaUtkina and leave a comment about your favorite item in my Etsy shop. Don't forget to leave your e-mail address so I can contact you in case you win. Your e-mail info will NEVER be used for any other purposes!!!

Extra entries:


Please leave one separate comment for each entry. (So if it is 2 extra entries for example, leave 2 comments, etc.)

1 entry - follow my blog with Google friend connect

1 entry - follow me on Twitter TonyaUtkina

1 entry - like my Facebook Fan page TonyaUtkina Jewelry

1 entry per day - retweet the following message and post a comment about it (just copy and paste the following into the twitter window). Can be done daily:
RT @tonyautkina GIVEAWAY Red Berry Earrings! Visit my blog http://tonyautkina.blogspot.com/2010/10/giveaway-red-berry-earrings.html

2 entries - grab my button and put it on your blog

3 entries - blog about this giveaway

No purchase is neccessary, but if you happen to buy something you will get extra 5 entries .

Open to US and Canada only. Winner will be chosen by online random generator. Winner will be notified by e-mail on Thursday, October 14, 2010 and will have 3 days to reply or another winner will be chosen.

Good luck!:)

Wednesday, October 6, 2010

Happy Halloween findings on Etsy

I just created a Happy Halloween collection featuring bright orange Etsy findings. It's amazing how many wonderful pieces are created and sold on Etsy every day! It took me some time to locate these favorites as there are so many great items to choose from! My children love Halloween. I suspect they love it more than Christmas. Although I doubt if it's possible! Ok! They love Halloween at least as much as they love Christmas! So here is my tribute to Halloween!
halloween

I featured the following great Etsians in the Happy Halloween treasury:
MyWayToSay, FleetingStillness, graphicland, SilkMagic, bumblestore, Oksa, VitalTemptation, TomBjornDesigns, Beautyland, CuffeShop, FineEmbroidery, katrinshine, KarisaGraphic, cushyadornments, CityCrochet, herbolution