It is so much fun to decorate your home for Halloween. If you have children it is even more fun as they usually love Halloween and craft projects that go with it. I have come up with an idea of making Halloween themed glass coasters. I already tried scary pumpkins. This time around I'll put a black cat on my coasters.
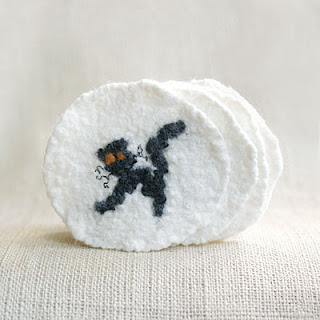
To make felted wool coasters we will need white, black and orange felting wool, water, soap and bubble wrap plastic paper.
On a piece of bubble wrap plastic paper arrange pieces of white felting wool so that they form a circle. You can put one layer of wool for future coasters to be thin or a few layers for them to be thicker. Don't forget that wool will shrink by about 30%. Depending on the size of future coasters add 30% to their original size.

Once the white circle is there start working on a black cat. Let one piece of black wool be the cat's tail, another - its back. Form a circle out of black wool and make the cat's head. Decorate your cat with additional features like orange eyes, whiskers made of black thread, etc. Use your imagination to make your cat funny, scary or cute! It's important you arrange all the details carefully so that they don't mix up later on.

Once the cat is ready start felting. To felt add soapy water and cover the wool with another layer of bubbled wrap paper. Make sure the original image of the black cat stays as much intact as possible. Start carefully rubbing the plastic paper. Felting shouldn't take long. Once all the wool fibers attach to each other the coaster is ready.

Rinse your coasters well and let them dry overnight. If you wish to make more that one coaster keep in mind that it's almost impossible to completely replicate your original image. You can more or less follow the steps of replicating your original design but at the end all cats will look different. If you love handmade and are ready for all your cats to look special and different go for it!


Sunday, September 9, 2012
DIY How to make Halloween black cat felted coasters
Thursday, August 30, 2012
DIY How to make felted Halloween coaters
Since we moved to US Halloween has become one of our favorite holidays. It's so much fun to dress up, decorate our home and invite guests on Halloween. As usual we will make a few Halloween family projects to decorate our house.
I would like to share a simple project that could be accomplished either by one person or a whole family. This time we will make Halloween themed pumpkin coasters that will add color to our house and make it ready for the holidays. Children will no doubt have fun making funny pumpkins with scary faces.

We will need white and black felting wool, water, soap and bubbled wrap paper. If you have orange felting wool it's even better as in that case we won't have to dye it.

To start our project we have to lay down pieces of white (orange) wool on a large piece of bubbled wrap paper. Bubbles on the paper should face up. In order for our coasters to be round we should try to form a circle out of our pieces of wool. As a result of felting our wool will shrink by about 30%. Keep it in mind! We will have to make our circles about 30% larger than the original size we want them to be.
We can put as many layers of wool as we want. More layers are there thicker the coasters will be.

With pieces of black wool we form a small circle and place it on our white wool. It will be our pumpkin's eye. It's time to unleash your creativity! You can make your pumpkin look funny, happy or scary by making eyes of different shapes and sizes. The same is true for a mouth. We can make it happy or sad.
As soon as the pumpkin's face is ready we can carefully wet and soap it. Make sure the face expression doesn't alter or we will not be able to fix it later. Once the wool is wet we can start felting by rubbing the paper. In the process of felting individual wool fibers will adhere forming a firm piece. We continue felting adding water and soap as needed. The process is completed when individual wool fibers are stuck and we are unable to separate them. It's time to rinse our project and let it dry.

If you originally used white wool it's time to dye it in orange so that our pumpkin looks like a true Halloween creature!
To dye our coaster I used orange KoolAid. In a plastic tray suitable for use in a microwave I mixed water and orange KoolAid. I put my white coaster in the orange solution and kept it in the microwave until it boiled. Be careful handling the tray as it's very hot! Your coaster now is nice and orange. Let it cool and when it's cool rinse it and let it dry. Your orange pumpkin coaster is ready!


