This lemon sponge cake is great for light desserts' admirers. It has a very saturated but not dominating lemon taste.
The cake was baked by Andrei Utkin with a recipe by David Lebovitz from his book Ready for Dessert.
We will have to cook three separate ingredients for the cake. First we prepare a lemon curd, then a lemon syrup and finally a sponge cake itself.
Ingredients for the lemon curd:
1/2 cup 9125 ml) freshly squeezed lemon juice
1/2 cup (100 g) sugar
6 tablespoons butter
2 large eggs
2 large egg yolks
Ingredients for the lemon syrup:
3/4 cup (180 ml) water
1/3 cup (65 g) sugar
1/4 cup (60 ml) freshly squeezed lemon juice
2 tablespoons kirsch (not required)
Additional Ingredients:
1 cup (250 ml) heavy cream
2/3 cup (75 g) crushed amaretti cookies
In a saucepan combine lemon juice, sugar and butter. Set the saucepan over low heat. In another bowl whisk together the eggs and egg yolks. Pour the egg mixture into the saucepan whisking constantly, until the curd starts to thicken. Don't boil it!
When the curd is ready let it cool and then refrigerate.
To make the lemon syrup warm the water and sugar in a saucepan. When the sugar dissolves remove from the heat, stir in lemon juice and the kirsch. Let it cool completely.
Bake a sponge cake 12 by 18 inch (30 by 46 cm) and cut it in two pieces so that it fits into a baking dish. Whisk the cream until it turns into a whip cream. Mix the whipped cream and the lemon curd.
Put one layer of the sponge cake on the bottom of the baking dish and brush evenly with about 1/2 cup of the lemon syrup. Spread 1/2 of the lemon cream evenly on top of the first cake layer and sprinkle with amaretti crumbs. Lay the second piece of the sponge cake on top and repeat the procedure. The cake is ready. refrigerate until chilled. Sprinkle with the rest of amaretti crumbs before serving.

Friday, September 23, 2011
Lemon sponge cake Semifreddo
Ginkgo hand felted yellow leaf brooch
Ginkgo tree is an amazing plant. It is a true living fossil which means that its fossils date back 270 million years. The plant survived all major planet Earth's cataclysms and extinction events. At some point of its history Ginkgo trees were widespread all over our planet. In our times they have long been cultivated in Asia where its seeds are widely used in local cuisine.
Ginkgo leaves are of a very peculiar shape. They look like fans with veins pointing towards an edge of a leaf. During the summer leaves are of a regular green color but in the fall leaves turn canary yellow making Ginkgo trees excellent ornamental yard and street plants.
Ginkgo leaves have long been used in medicine. Some studies suggest that extracts of Ginkgo leaves improve blood flow and enhance memory. Seeds of Ginkgo trees are considered by some Asian nations to have aphrodisiac properties and are sometimes offered at special occasions such as Chinese New Year or weddings.
A unique shape and bright yellow color of Ginkgo leaves in the fall are very inspirational. I always wanted to create a brooch that would remind me of these canary yellow fans. There is something really ancient and pre-historic in the way these beautiful leaves look.
According to The Sibley Guide to Trees "four Ginkgo trees about a mile from the 1945 atomic blast at Hiroshima, Japan, were among the very few living things that survived, and soon regained their full health".
Monday, September 12, 2011
Fresh Ginger Cake
This yummy and spicy fresh ginger cake was baked by Andrei Utkin. An inspiration came from David Lebovitz recipes book "Ready for Dessert".
We will need:
4-ounce (115 g) piece fresh ginger, peeled and thinly sliced
1 cup (250 ml) molasses
1 cup (200 g) sugar
1 cup (250 ml) vegetable oil
2 and 1/2 cups (350 g) all-purpose flour
1 teaspoon ground cinnamon
1/2 teaspoon ground cloves
1/2 teaspoon ground black pepper
1 cup (250 ml) water
2 teaspoons baking soda
2 large eggs
Preheat the oven to 350 F (175C) and butter a round cake pan.
In a food processor chop the ginger and set it aside. In a large bowl, mix together the molasses, sugar and oil. In a medium bowl, whisk together the flour, cinnamon, cloves and pepper. In a small saucepan, bring the water to a boil, then stir in the baking soda. Whisk the hot water into the molasses mixture, then ass the chopped ginger.
Gradually sift the flour mixture over the molasses mixture, whisking to combine. Add eggs and whisk until thoroughly blended.
Bake until the top of the case springs back when lightly presses with a finger for about 1 hour.
The cake is moist and will store well for a few days. Enjoy the cake!
Saturday, July 2, 2011
Summer Wedding Essentials contest results
Russian Artists team on Etsy just had its Summer Wedding Essentials contest. Fifty six team shops took part in the contest submitting their hand made wedding-themed items. All of the entries were fantastic! They can be checked out at Russian Artists Facebook Page.
Although all of the items submitted were amazingly beautiful, creative and unique, I picked up a few of my personal favorites. All of the wonderful items presented will make any wedding an unforgettable experience!
1. Dog Crochet Wedding Floral Collar by mailo
2. Event Decor for the Wine Glass by MamaTita
3. Tea Set, Original decorative painting by Yury Tarler
4. White earrings with pearls by HoneyCase2
Tuesday, June 28, 2011
Coconut Macaroons recipe
These yummy and simple to make coconut macaroons were baked by Andrei Utkin. An inspiration came from David Lebovitz recipes book "Ready for Dessert".
You will need:
8 egg whites
2 and 1/2 cups sugar
1/2 teaspoon salt
2 tablespoons honey
5 cups dried unsweetened shredded coconut
1/2 cup all-purpose flour
1 teaspoon vanilla extract
In a large saucepan we mix together egg whites, sugar, salt, honey, coconut, flour and vanilla. We cook the mixture gently over a medium-low heat until the bottom just begins to sizzle. Let the mixture cool a bit.
Preheat the oven to 350 F. Line 2 baking sheets with parchment paper or silicone baking mats. With your fingers form 1 and 1/2 inch pyramids out of the mixture and place them on the baking sheets.
Bake, rotating the baking sheets midway during baking, until the macaroons are evenly deep golden brown, about 20 minutes. Let macaroons cool on the baking sheets.
The recipe makes about 60 macaroons.
Saturday, June 25, 2011
Tutorial How to make hand crocheted necklace with buttons
I've recently came across a large bag of multicolored buttons in a crafts store and just could not stop myself from buying one. The buttons are of different sizes, shapes and hues of blue and green. They are great for a hand crocheted summer necklace. 
To make a necklace we will need a mercerized cotton thread, a toggle clasp, a crochet hook and about 30 buttons of different sizes and colors. To make crocheting simple and to safe us some time we will start with beading all out buttons on a thread first. Once all our buttons are ganging there nicely we can start crocheting.
I'll crochet a simple foundation chain adding buttons with 1 or 1 and 1/2 inch. intervals. In case you would like to make your necklace longer you can add some more buttons or make a space between them larger. I like to mix and match hues of green and blue so that the necklace looks unique and stylish. 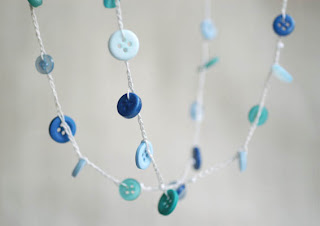
I plan on crocheting 34 inch. necklace so that I could wear it either on my neck or my arm. Some people wear crocheted necklaces on their waist instead of a belt or on their ancle.
The necklace crocheting shouldn't take more than 15 minutes. When the thread is ready we will attach toggle clasp to it and our summer bright necklace is ready to wear. It's a perfect summer accessory and will make you look beautiful and special!
Wednesday, June 15, 2011
Water lily felted flower brooch in purple violet
Flowers come in different shapes and colors. The diversity of nature always inspires me. This time I've decided to make a felted flower brooch that will look like a water lily.
First of all I hand felted a large number of purple colored wool pieces in shapes of flower petals. I tried to make my petals long and somewhat narrow. At first I planned on making two-colored flower brooch and hand felted pieces of white wool as well. Later I changed my mind and created a purple colored brooch adding a few white shiny beads instead.
After my wool petals dried up I started arranging them into different patterns to find the one I liked the most. It's easy to do it while they are not yet attached and turned into an actual brooch. It's always fun to lay out different designs with different pieces of felted wool.
After a while I figured out what exactly I wanted to do with my wool. I attached all my numerous purple colored felted wool pieces to a hand crocheted base. To accent the color I added tiny white beads that look like small flower stamen.
The brooch is ready to wear now!

