We are surrounded by bright and colorful autumn leaves and berries. Fall is such a beautiful season! It would be nice to make a vivid Fall accessory to remind us of these amazing few months. I've created this mini bag using felting wool of different colors. Red berries look a bit like bright mountain ash berries in the Fall.
My Giveaway: Red Berry felted mini bag

To make a hand felted mini bag you will need white wool, water, soap and bubble wrap paper. To create a picture design on your pouch it would be great to have additional feting wool of different colors. For a strap you can always use a rope or hand crochet one of a white cotton thread.

As the very first step cut out a rectangular piece of bubble wrap paper. You will use the rectangular piece to create your mini bag. Depending on the desired size of your future mini bag increase the size of the cut out by about 30%. Do not forget that wool will shrink as a result of felting.

On a large piece of bubble wrap paper arrange pieces of white wool to form a rectangle. The size of the wool rectangle should be a bit bigger than the size of the plastic cut out. Lay out at least two layers of wool on top of each other for your mini bag to turn out firm and durable.
On top of the white wool rectangle put your plastic cut out. The wool rectangle should be slightly bigger than the cut out. You will use that extra wool to form bag's sides. On top of the plastic rectangle lay white wool. You will get a wool rectangle with a plastic cut out inside.

Wet the wool with soapy water. Bend white wool on both sides and at the bottom to form a bag. Cover the wool with a large piece of bubble wrap paper and start carefully rubbing the plastic paper.
To make a picture design arrange pieces of dyed wool into a desired design and cover with a large piece of bubble wrap paper. Felt until the wool fibers attach and form a firm and homogeneous piece. Rinse your rectangular piece well and let it dry overnight.
To turn you felted rectangular piece into a mini bag attach a button or hand felted bead and a strap. To make it easy use a rope as a strap.


Thursday, September 20, 2012
DIY How to make felted wool mini bag
Monday, September 17, 2012
Autumn butterfly
Autumn is upon us! With very few bushes still in bloom we see less and less of beautiful butterflies. They will be all gone pretty soon. I took a picture of this beautiful butterfly in our front yard. It will help me remember warm days and beautiful colors of autumn!


Wednesday, September 12, 2012
Hand embroidered jewelry by Skrynka
Many countries have deeply routed traditions of folk music, art and dance. It's amazing to look into how people used to live centuries ago and how they tried to make their lives bright and beautiful by decorating their homes with traditional ornaments. I find Eastern European folk art quite unique and inspiring. I've recently come across a fantastic artist Natalka of Skrynka who creates distinctive and beautiful hand embroidered and cross stitched jewelry and home decor pieces.

Could you please tell us a bit about yourself?
My name is Natalka. I live in Ukraine. I've been sewing, knitting and hand making items since I was a child. However, embroidery is my main passion. I may occasionally fall in love with a different technique or fiber but I always come back to my main obsession which is embroidery and cross stitching.
I'm a mom of a 2 years old and try to share time between my family and my business of making folk inspired jewelry. I dream about developing my business into something feasible one day. I would love to travel, see the world together with my family or even move to a place next to the sea. It's all in the plans for now. I hope one day I'll be able to combine my dreams and aspirations with my business and family life.

How did you start?
I started embroidering and cross stitching when I was a small child. I used to embroider large images but my true passion was always unique Ukrainian folk ornaments and patterns. I dreamed about combining folk embroidery with contemporary art and craft.
Soon after I had my son I decided it's time to turn my hobby into a business. I started making cross stitched jewelry and home decor items. Most importantly people like what I create. It's such a great pleasure to make items that actually inspire other people and make them happy.

What are your main sources of inspiration?
My main source of inspiration is traditional Ukrainian ornaments and patterns. I collect pictures of old traditional folk dresses such as blouses, skirts, festive towels, etc. I often visit our local museum of ornamental and folk art. I also collect books about old and traditional home decorations, designs and Ukrainian medieval clothes.
Each region has its own distinctive patterns and colors. I've noticed that nations living on different continents sometimes have somewhat similar ornaments and patterns. I keep finding similarities between Ukrainian folk embroidery and embroidery of native Americans and Mexicans.

What fibers do you work with?
I mostly work with natural and eco friendly fibers. I prefer to work with linen fabrics, wool felt and rarely with eco-friendly manufactured felt. To create my jewelry pieces I use lead-free and nickel-free jewelry making supplies. I take it seriously and have an equipment set up at home to check levels of different metals in my supplies. It's always better to double-check suppliers and make sure items I use for jewelry making are lead and nickel free.
I myself have very sensitive ears and, thus, always use only non-sensitizing ear hooks for my earrings.

Our planet is suffering from over development and over use. I believe that we should all be concerned about the future of our planet. Even small improvements we could do to make our life more eco-friendly will benefit our planet and us as a result. I strongly believe that by buying hand made items people not only get high quality and unique things made with love but help individual artists and their families to keep their creative process alife. It makes a big difference for everyone!

Sunday, September 9, 2012
DIY How to make Halloween black cat felted coasters
It is so much fun to decorate your home for Halloween. If you have children it is even more fun as they usually love Halloween and craft projects that go with it. I have come up with an idea of making Halloween themed glass coasters. I already tried scary pumpkins. This time around I'll put a black cat on my coasters.
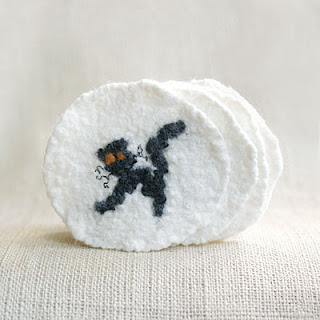
To make felted wool coasters we will need white, black and orange felting wool, water, soap and bubble wrap plastic paper.
On a piece of bubble wrap plastic paper arrange pieces of white felting wool so that they form a circle. You can put one layer of wool for future coasters to be thin or a few layers for them to be thicker. Don't forget that wool will shrink by about 30%. Depending on the size of future coasters add 30% to their original size.

Once the white circle is there start working on a black cat. Let one piece of black wool be the cat's tail, another - its back. Form a circle out of black wool and make the cat's head. Decorate your cat with additional features like orange eyes, whiskers made of black thread, etc. Use your imagination to make your cat funny, scary or cute! It's important you arrange all the details carefully so that they don't mix up later on.

Once the cat is ready start felting. To felt add soapy water and cover the wool with another layer of bubbled wrap paper. Make sure the original image of the black cat stays as much intact as possible. Start carefully rubbing the plastic paper. Felting shouldn't take long. Once all the wool fibers attach to each other the coaster is ready.

Rinse your coasters well and let them dry overnight. If you wish to make more that one coaster keep in mind that it's almost impossible to completely replicate your original image. You can more or less follow the steps of replicating your original design but at the end all cats will look different. If you love handmade and are ready for all your cats to look special and different go for it!


Friday, September 7, 2012
DIY How to make a maple leaf brooch
Let us make a felted brooch in a shape of a maple tree leaf. Autumn will be here before we know it. Fall inspired accessories will look great on our coats and outerwear. The maple leaf brooch is relatively easy to make. You will need a table to put a piece of bubbled wrap paper. It's great if the table's surface can endure water and soap as with felting you will get your table wet.
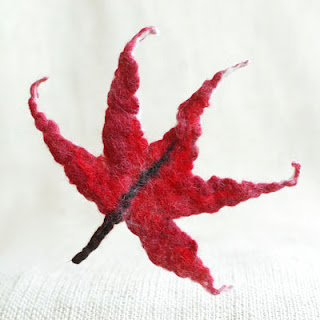
You will need felting wool in red, burgundy and brown. For felting you will need soap, water and bubbled wrap paper.

On a piece of bubbles paper arrange five pieces of burgundy red felting wool. They will be our maple leaves. In the middle add a piece of brown wool. To add color put a few small pieces of bright red wool here and there. I suggest you experiment with colors and add a bit of green, black, dark brown or ever blue. Colors will add volume to the leaf and make it look bright.

Once the leaf is arranged wet it with soapy water and cover with another piece of bubbled wrap. Start gently rubbing the plastic paper. The leaf is felted when all the wool fibers stay intact and attached to each other.

The brooch is almost ready. Rinse it well in water and let it dry. Attach a safe pin at the back of the leaf to turn it into a brooch. You can wear this brooch with pretty much any outfit. It will look great on winter coats and outerwear.


Thursday, September 6, 2012
Crochet and plush toys by RomeoShop
I came across bright and cute toys by RomeoShop looking for a gift. They look very cheerful and radiate a lot of positive energy. That's exactly what we are look for in toys. We all want toys to be fun, to make our children happy. Helen who makes these amazing toys and is originally from Ukraine talked to me about her own childhood and the art of toy making.

Helen: I love toys! I don't remember if I ever played with toys but I remember very well as I actually made them with my own hands. My mom had a sewing machine that I mastered by 8. For inspiration I used patterns from a magazine Burda that was available in Ukraine back then. If for some reason I couldn't use my mom's sewing machine I would crochet my toys using a simple thread and a hook. My mom still owns a few of my first handmade toys.

At some point of my life I abandoned toy making and led a life of an ordinary person. I had my full time job and all the corresponding routines. But when I gave birth to my son Romeo something has changed. I'm making toys again and that's how it should be!

My main inspiration is my son Romeo. We explore outside world together looking at butterflies, chasing cats, reading beautifully illustrated books, watching cartoons. It all helps me to come up with new ideas. Inspired I draw a picture first and then transform my picture into a toy. If for some reason I cannot sew my toy I crochet it.
I've got a lot of plans for the future. I'm a realist and perfectly understand that probably not all of my ideas will turn into real toys. I sometimes regret that I don't make enough toys for boys. That's why I plan to make a set of bugs boys could play with. When we think about bugs we have a picture of something not very attractive. My goal is to make my bugs cute and funny. I plan on making a toy chain saw and a drill.

I love bright colors and simple forms. All my toys are funny, happy and cute. Children are exactly the same. That's why children really like my toys!

Sunday, September 2, 2012
DIY How to make Halloween ghost home decoration
Some of us will most probably decorate our homes for Halloween. I would like to share an idea of a DIY project of making felted ghosts for Halloween.

We will need white and black felting wool, a glass to use as a form, soap, water and a piece of bubbled wrap paper.

On a piece of bubbled wrap paper put an empty glass upside down. Slowly start to cover it with white wool. It makes sense to water the surface of the glass beforehand so that our pieces of wool could stick to it. Once the glass is all covered with wool it's time to wet our wool with soapy water. It makes sense to water it slowly so that our wool doesn't fall off the glass and stays there covering it nicely. Once white wool is wet we can start making our ghost's "face".

With a piece of black wool make an eye and attach it to our white ghost. It's much fun to experiment with sized and eye position as our ghost's face expression will change dramatically depending on what shape and size ghost's eyes will be.
Once all the wool pieces are at place we can start the felting process. Carefully wrap bubbled paper around our glass and start rubbing it. Be gentle so that our wool doesn't fall off the glass. Once wool fibers become inseparable and our white form turns into a firm piece of felted wool it's time to rinse it.
To dry it well I let it sit on a glass overnight. Thus, the original form of the glass will be preserved and whet our ghost is nice and dry it will stay firm and round. I've attached a thread on top of it so that I could hang it anywhere in my room or outside. My little white ghost turned out to be not scary at all. But it's all in your own hands. Designing the ghosts face is the most creative part of the whole process!


