Вы когда-нибудь пробовали испечь свой хлеб? Если нет, то давайте попробуем. Это совсем не сложно. Все, что вам понадобится это немного терпения и чугунная кастрюля с плотно прилегающей крышкой.
Хлеб, который продается в магазинах зачастую не самый свежий и вкусный. В какой-то момент мы набрели на статью в газете Нью Йорк Таймс, где рассказывалось о том, как испечь хлеб в домашних условиях без хлебопечки. Мы решили попробовать и оказалось, что это совсем не сложно. При этом результат превзошел все наши ожидания! Такого вкусного хлеба мы наверное никогда еще не ели. Было особенно приятно, что испекли мы его сами, своими руками!

Вам понадобятся:
500 гр. неотбелённой муки высшего сорта
375 гр. воды (75% веса муки)
1 и 1/2 чайной ложки соли
1/4 чайной ложки сухих дрожжей
Чтобы хлеб получился воздушным и сдобным его необходимо выпекать в толстой чугунной кастрюле с плотно прилегающей крышкой (утятнице).
Секрет выпечки домашнего хлеба - в точности измерений! Чтобы хлеб получился, надо очень точно отмерить пропорцию муки и воды. Именно поэтому и вода и мука приводятся в граммах. Вес воды должен составлять 75% веса муки.

Процесс приготовления:
В отдельной кастрюле или миске легонько перемешайте муку, воду, соль и дрожжи. Достаточно просто дать муке немного намокнуть. Накройте миску полотенцем и забудьте про нее на 15-18 часов. Желательно, чтобы кастрюля стояла в месте с комнатной температурой. За это время дрожжевая культура разрастется до нужных размеров. Через 15-18 часов на поверхности муки вы увидите много больших пузырей. Наш хлеб готов к выпеканию!
Чуть чуть присыпьте ваш хлеб мукой и выложите его из миски на стол. Сформируйте из массы круглую булку. Накройте булку полотенцем и дайте постоять 1,5 - 2 часа.
Поставьте чугунную кастрюлю в духовку и разогрейте вашу духовку до 260 С. Кастрюля должна нагреться. Очень важно, чтобы на чугунной кастрюле не было пластмассовых ручек, иначе они расплавятся. Чугунная кастрюля будет очень горячей и поэтому надо очень аккуратно вынимать ее из духовки!
Аккуратно переложите вашу булку в горячую чугунную кастрюлю. Накройте кастрюлю крышкой и выпекайте в течение 30 минут. После этого снимите крышку, убавьте температуру духовки до 215 С и выпекайте еще 15 минут, чтобы корка хлеба подрумянилась.
Вот и все! В нашей семье этот хлеб съедается моментально! Мы заметили, что друзья стали чаще заглядывать к нам в гости. Уж не хлеб ли этому причиной?
Удачного вам выпекания!

Wednesday, February 6, 2013
Печём домашний хлеб - полезно и не сложно
Tuesday, October 2, 2012
Eco friendly felted accessories by EthicStyle
I love felting for its eco friendliness and beauty. Felted items are created out of basic materials like wool, water and soap. They radiate positive energy as natural warmth. While felting an artist doesn't add any special glues or additives. The process is very straightforward and, yet, it's not easy to turn a piece of wool into an art object. The simplicity of the process is very deceptive. I've recently discovered a really cool artist Svetlana of EthicStyle who creates unique and fun looking felted accessories.

Can you tell us a bit about yourself?
I was born in Latvia in a small city by the sea. I live in Germany now and create felted accessories and home decor items. I love to experiment with wool creating bags, shoes, jewelry, toys, etc. All my items are made of pure wool. I love minimalism, natural and eco friendly materials, comfort and quality. I try to create items that are different and unique.

How did you start?
I've been designing and hand making items pretty much all my working life. After I had my daughter I picked up felting. I thought it would be nice for my daughter to have unique toys that nobody else has. Wool is an amazing fiber. It's soft, comfy and durable. It turned out to be a perfect material to make baby toys. I was completely fascinated by wool as it gives an artist so much freedom to create and experiment.

What inspires you?
I'm inspired my Japanese minimalism. I like it for its simplicity, elegance and perfection. I love nature especially in the autumn and spring when air is so transparent. I love the sea. It's amazing to walk by the sea barefoot stepping on warm sand.
My daughter brings a lot of joy into my life. Her phrases that start with: "mom, did you know that..." make me wonder and think about many things that surround us. I discover and learn so much when I'm with her.

What fibers do you work with?
I only use natural fibers such as undyed merino wool, alpaca wool, silk and plant's fibers. All my children toys are stuffed with wool exclusively.
All items made of wool feel so special when held in one's arms.

Sunday, September 9, 2012
DIY How to make Halloween black cat felted coasters
It is so much fun to decorate your home for Halloween. If you have children it is even more fun as they usually love Halloween and craft projects that go with it. I have come up with an idea of making Halloween themed glass coasters. I already tried scary pumpkins. This time around I'll put a black cat on my coasters.
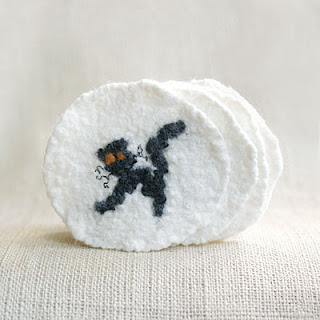
To make felted wool coasters we will need white, black and orange felting wool, water, soap and bubble wrap plastic paper.
On a piece of bubble wrap plastic paper arrange pieces of white felting wool so that they form a circle. You can put one layer of wool for future coasters to be thin or a few layers for them to be thicker. Don't forget that wool will shrink by about 30%. Depending on the size of future coasters add 30% to their original size.

Once the white circle is there start working on a black cat. Let one piece of black wool be the cat's tail, another - its back. Form a circle out of black wool and make the cat's head. Decorate your cat with additional features like orange eyes, whiskers made of black thread, etc. Use your imagination to make your cat funny, scary or cute! It's important you arrange all the details carefully so that they don't mix up later on.

Once the cat is ready start felting. To felt add soapy water and cover the wool with another layer of bubbled wrap paper. Make sure the original image of the black cat stays as much intact as possible. Start carefully rubbing the plastic paper. Felting shouldn't take long. Once all the wool fibers attach to each other the coaster is ready.

Rinse your coasters well and let them dry overnight. If you wish to make more that one coaster keep in mind that it's almost impossible to completely replicate your original image. You can more or less follow the steps of replicating your original design but at the end all cats will look different. If you love handmade and are ready for all your cats to look special and different go for it!


Thursday, September 6, 2012
Crochet and plush toys by RomeoShop
I came across bright and cute toys by RomeoShop looking for a gift. They look very cheerful and radiate a lot of positive energy. That's exactly what we are look for in toys. We all want toys to be fun, to make our children happy. Helen who makes these amazing toys and is originally from Ukraine talked to me about her own childhood and the art of toy making.

Helen: I love toys! I don't remember if I ever played with toys but I remember very well as I actually made them with my own hands. My mom had a sewing machine that I mastered by 8. For inspiration I used patterns from a magazine Burda that was available in Ukraine back then. If for some reason I couldn't use my mom's sewing machine I would crochet my toys using a simple thread and a hook. My mom still owns a few of my first handmade toys.

At some point of my life I abandoned toy making and led a life of an ordinary person. I had my full time job and all the corresponding routines. But when I gave birth to my son Romeo something has changed. I'm making toys again and that's how it should be!

My main inspiration is my son Romeo. We explore outside world together looking at butterflies, chasing cats, reading beautifully illustrated books, watching cartoons. It all helps me to come up with new ideas. Inspired I draw a picture first and then transform my picture into a toy. If for some reason I cannot sew my toy I crochet it.
I've got a lot of plans for the future. I'm a realist and perfectly understand that probably not all of my ideas will turn into real toys. I sometimes regret that I don't make enough toys for boys. That's why I plan to make a set of bugs boys could play with. When we think about bugs we have a picture of something not very attractive. My goal is to make my bugs cute and funny. I plan on making a toy chain saw and a drill.

I love bright colors and simple forms. All my toys are funny, happy and cute. Children are exactly the same. That's why children really like my toys!

Sunday, September 2, 2012
DIY How to make Halloween ghost home decoration
Some of us will most probably decorate our homes for Halloween. I would like to share an idea of a DIY project of making felted ghosts for Halloween.

We will need white and black felting wool, a glass to use as a form, soap, water and a piece of bubbled wrap paper.

On a piece of bubbled wrap paper put an empty glass upside down. Slowly start to cover it with white wool. It makes sense to water the surface of the glass beforehand so that our pieces of wool could stick to it. Once the glass is all covered with wool it's time to wet our wool with soapy water. It makes sense to water it slowly so that our wool doesn't fall off the glass and stays there covering it nicely. Once white wool is wet we can start making our ghost's "face".

With a piece of black wool make an eye and attach it to our white ghost. It's much fun to experiment with sized and eye position as our ghost's face expression will change dramatically depending on what shape and size ghost's eyes will be.
Once all the wool pieces are at place we can start the felting process. Carefully wrap bubbled paper around our glass and start rubbing it. Be gentle so that our wool doesn't fall off the glass. Once wool fibers become inseparable and our white form turns into a firm piece of felted wool it's time to rinse it.
To dry it well I let it sit on a glass overnight. Thus, the original form of the glass will be preserved and whet our ghost is nice and dry it will stay firm and round. I've attached a thread on top of it so that I could hang it anywhere in my room or outside. My little white ghost turned out to be not scary at all. But it's all in your own hands. Designing the ghosts face is the most creative part of the whole process!


Thursday, August 30, 2012
DIY How to make felted Halloween coaters
Since we moved to US Halloween has become one of our favorite holidays. It's so much fun to dress up, decorate our home and invite guests on Halloween. As usual we will make a few Halloween family projects to decorate our house.
I would like to share a simple project that could be accomplished either by one person or a whole family. This time we will make Halloween themed pumpkin coasters that will add color to our house and make it ready for the holidays. Children will no doubt have fun making funny pumpkins with scary faces.

We will need white and black felting wool, water, soap and bubbled wrap paper. If you have orange felting wool it's even better as in that case we won't have to dye it.

To start our project we have to lay down pieces of white (orange) wool on a large piece of bubbled wrap paper. Bubbles on the paper should face up. In order for our coasters to be round we should try to form a circle out of our pieces of wool. As a result of felting our wool will shrink by about 30%. Keep it in mind! We will have to make our circles about 30% larger than the original size we want them to be.
We can put as many layers of wool as we want. More layers are there thicker the coasters will be.

With pieces of black wool we form a small circle and place it on our white wool. It will be our pumpkin's eye. It's time to unleash your creativity! You can make your pumpkin look funny, happy or scary by making eyes of different shapes and sizes. The same is true for a mouth. We can make it happy or sad.
As soon as the pumpkin's face is ready we can carefully wet and soap it. Make sure the face expression doesn't alter or we will not be able to fix it later. Once the wool is wet we can start felting by rubbing the paper. In the process of felting individual wool fibers will adhere forming a firm piece. We continue felting adding water and soap as needed. The process is completed when individual wool fibers are stuck and we are unable to separate them. It's time to rinse our project and let it dry.

If you originally used white wool it's time to dye it in orange so that our pumpkin looks like a true Halloween creature!
To dye our coaster I used orange KoolAid. In a plastic tray suitable for use in a microwave I mixed water and orange KoolAid. I put my white coaster in the orange solution and kept it in the microwave until it boiled. Be careful handling the tray as it's very hot! Your coaster now is nice and orange. Let it cool and when it's cool rinse it and let it dry. Your orange pumpkin coaster is ready!


Monday, October 18, 2010
Artisan bread recipe for your holiday dinner
Have you ever tried to bake your own bread? It's not as complicated as you might think. All it takes is time and a dutch oven. It can be a great addition to your holiday dinner as it not only tastes good it looks fantastic!
We love nice and fresh artisan bread the type you cannot find in regular supermarkets. That's why my husband made a simple research on-line one day and found a great New York Times article about baking simple artisan bread at home. We tried to bake our own and the result exceeded all our expectations. From that time on our home baked artisan bread is a staple in our house and my kids simply cannot do without it. We try to bake it once or twice a week as it doesn't last long in our family!
This bread is relatively simple to cook. You will need 500 gr. of unbleached bread flour, 375 gr. of water or 75% of the flour weight, 1 and 1/2 tea spoons of salt and 1/4 tea spoon of yeast. To bake it right you will need a dutch oven that can be actually used for cooking a lot of other fantastic dishes later on.
The secret is in precise measurements! The water amount should not exceed 75% of the flour weight!
We mix up all ingredients just enough for flour to get wet and put the mixture aside for 15-18 hours depending on your room temperature. We, thus, give yeast enough time to work on flour in a natural and old fashioned way.
After full 15-18 hours our raw bread is pretty much ready. We create a baker’s envelop on a table and then form a loaf out of our mixture. The stove should be preheated to 500F and our dutch oven should be already inside hot and ready. If you plan on baking bread don't buy a dutch oven that has anything plastic on it. All this plastic will melt away! And please be careful with that hot dutch oven! It’s very very hot!
The actual cooking time is 30 minutes. After that we leave our dutch oven inside the stove for additional 15 minutes but take the lid off for our bread to get a beautiful and crunchy top crust. It makes sense to decrease the stove temperature to around 420F so that our bread doesn't burn.
That's pretty much it. We always give our bread time to cool down although it is hard to do with our kids circling around. When you bake this artisan bread your home fills with unbelievable aromas that make you think of holidays, family gatherings and feasts.
This bread tastes very good and it's quite simple to bake. It's definitely worth trying!

