So many wonderful artists work in traditional techniques of embroidery and stitching. Some of the best items were inspired by folk ornaments and designs, others by pieces by great artists of the past and present. Yet it's not often we come across an artist who creates her embroidery and stitches on unconventional materials like wall racks, shelf key holders, bed headboards. I've recently got to know Lena of STEDI who does just that.

Could you tell us a bit about yourself?
I was born and raised in Russia. For the past 13 years I've been living in Utrecht, Netherlands. I'm a fashion designer by training and spent many years working for different fashion labels. These days fashion design is all about computers and I love being able to actually make things with my hands. As a designer I like to combine different styles, fibers and objects. I like to try out new ways of decorating every day objects we are so used to.
Traditionally embroidery is applied on different fabrics. However, if one has necessary tools he or she can embroider pretty much anything.

How did you start?
We started adding embroidery to simple items everyone has in his or her household. When I add embroidery to coat-hangers, small shelves, racks they turn into different objects with their own style. Such objects radiate new energy and add style and coziness to every home.
Our first ever embroidered item was our bed. My husband came up with a design and I embroidered its headboard. The idea was to create a country style bed with embroidery made of raw wool threads of different colors. Although the original ornament was pretty simple, the bed turned out to be a great addition to our bedroom. Since then we worked on numerous objects using different stitching and embroidery techniques.

What are you sources of inspiration?
My family helps me a lot in creating my embroidered objects. My husband who has some technical background helps me with his knowledge of different types of materials and textures. My children inspire me to create my designs. The name STEDI is actually a combination of my children's names: Stefan and Diana.
I get a lot of inspiration from just looking at old embroidery patterns.

What are your plans for the future?
I constantly come up with new ideas. Small embroidery holes I make to let thread through gave me an idea of a new design. I enlarged those holes and started wrapping them in bright threads. Such bright holes look very contemporary and stylish. I'm currently making a few items embroidered in that way.
I plan on developing my metal embroidery techniques. The combination of metals and fiber threads looks very unique and fresh. This process is extremely difficult and time consuming but the result is always fantastic!
I try to recycle and upcycle as much of my materials as possible. There is no need to by new wood panels when one can always use pieces of old furniture or scraps from large furniture producing companies.

While hand making my unique embroidered pieces I get very happy and inspired. I believe that my clients get much of that happiness and inspiration from my objects incorporating them in their everyday life.

Monday, September 24, 2012
Embroidery and stitching on unconventional materials by STEDI
Sunday, September 2, 2012
DIY How to make Halloween ghost home decoration
Some of us will most probably decorate our homes for Halloween. I would like to share an idea of a DIY project of making felted ghosts for Halloween.

We will need white and black felting wool, a glass to use as a form, soap, water and a piece of bubbled wrap paper.

On a piece of bubbled wrap paper put an empty glass upside down. Slowly start to cover it with white wool. It makes sense to water the surface of the glass beforehand so that our pieces of wool could stick to it. Once the glass is all covered with wool it's time to wet our wool with soapy water. It makes sense to water it slowly so that our wool doesn't fall off the glass and stays there covering it nicely. Once white wool is wet we can start making our ghost's "face".

With a piece of black wool make an eye and attach it to our white ghost. It's much fun to experiment with sized and eye position as our ghost's face expression will change dramatically depending on what shape and size ghost's eyes will be.
Once all the wool pieces are at place we can start the felting process. Carefully wrap bubbled paper around our glass and start rubbing it. Be gentle so that our wool doesn't fall off the glass. Once wool fibers become inseparable and our white form turns into a firm piece of felted wool it's time to rinse it.
To dry it well I let it sit on a glass overnight. Thus, the original form of the glass will be preserved and whet our ghost is nice and dry it will stay firm and round. I've attached a thread on top of it so that I could hang it anywhere in my room or outside. My little white ghost turned out to be not scary at all. But it's all in your own hands. Designing the ghosts face is the most creative part of the whole process!


Thursday, August 30, 2012
DIY How to make felted Halloween coaters
Since we moved to US Halloween has become one of our favorite holidays. It's so much fun to dress up, decorate our home and invite guests on Halloween. As usual we will make a few Halloween family projects to decorate our house.
I would like to share a simple project that could be accomplished either by one person or a whole family. This time we will make Halloween themed pumpkin coasters that will add color to our house and make it ready for the holidays. Children will no doubt have fun making funny pumpkins with scary faces.

We will need white and black felting wool, water, soap and bubbled wrap paper. If you have orange felting wool it's even better as in that case we won't have to dye it.

To start our project we have to lay down pieces of white (orange) wool on a large piece of bubbled wrap paper. Bubbles on the paper should face up. In order for our coasters to be round we should try to form a circle out of our pieces of wool. As a result of felting our wool will shrink by about 30%. Keep it in mind! We will have to make our circles about 30% larger than the original size we want them to be.
We can put as many layers of wool as we want. More layers are there thicker the coasters will be.

With pieces of black wool we form a small circle and place it on our white wool. It will be our pumpkin's eye. It's time to unleash your creativity! You can make your pumpkin look funny, happy or scary by making eyes of different shapes and sizes. The same is true for a mouth. We can make it happy or sad.
As soon as the pumpkin's face is ready we can carefully wet and soap it. Make sure the face expression doesn't alter or we will not be able to fix it later. Once the wool is wet we can start felting by rubbing the paper. In the process of felting individual wool fibers will adhere forming a firm piece. We continue felting adding water and soap as needed. The process is completed when individual wool fibers are stuck and we are unable to separate them. It's time to rinse our project and let it dry.

If you originally used white wool it's time to dye it in orange so that our pumpkin looks like a true Halloween creature!
To dye our coaster I used orange KoolAid. In a plastic tray suitable for use in a microwave I mixed water and orange KoolAid. I put my white coaster in the orange solution and kept it in the microwave until it boiled. Be careful handling the tray as it's very hot! Your coaster now is nice and orange. Let it cool and when it's cool rinse it and let it dry. Your orange pumpkin coaster is ready!


Tuesday, May 29, 2012
Art clock by Anna Gaponova
We all put a lot of effort into making our homes look beautiful and cozy. There are so many ways to add color and style to our living room or our kitchen. I’ve recently come across a very talented artists Anna Gaponova from ArtClock. Anna hand paints wall clock to create unique and special art objects.

Q: Can you please tell us a bit about yourself?
My name is Anna and I live in Kharkiv, Ukraine. I’ve always been into drawing and painting. It all started as a hobby but later painting became my profession. My clocks are not just art objects. I paint on wooden plates and turn them into real clock that can serve both as a functional decoration and a piece of art.

Q: How have you come up with an idea of painting on clock?
I’ve painted my first clock two years ago. I had an old vinyl record at hand and decided to turn it into a wall clock. The process of painting and creating new clock-faces turned out to be so exciting that I’ve been making clocks ever since. Within time I substituted vinyl to wood and all my clocks have a wood base now. Since every painting is different and unique I hand cut all wood pieces myself. I don’t want to outsource anything and make sure every part of the clock is done the way it should be done.

Q: What inspires you?
I find my inspiration in folk, native ornaments and decorations of different peoples living all over the world. African, Mexican, Indian patterns and color combinations always serve as a huge source of inspiration for me. Everyday encounters can make me start thinking about a new image for my clocks be it a unique color combination or music accidentally overheard in a street.
My stylized drawings of elephants, turtles and fish serve as symbols of peace, love and happiness. I very much hope these images truly bring positive energy and luck to homes they settle in.
Thank you, Anna!

Friday, October 15, 2010
Holiday house decoration ideas
Holidays are approaching and we all are about to start decorating our houses. There are millions of ways to do it and tones of ideas how to make our homes cozy and beautiful. Here is one of the house decoration ideas for you to consider. 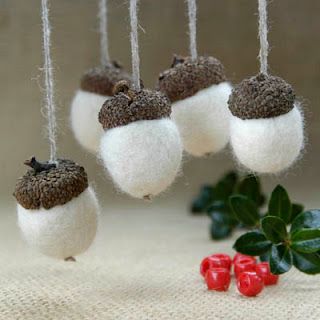
I've been felting for a while now. Let me tell you that it's quite easy to create felted wool balls. It's a matter of rolling felting wool between your palms occasionally wetting it and adding some soap. When squeezed these felted balls take shapes of ovals and fit perfectly into acorn heads. The result looks super cute. These felted wool acorns will last forever unlike real acorns! They could be of different colors and sizes. One can hang it on a Christmas tree, next to a computer, on a book shelf or just put them next to his or her bed.
A good idea is to decorate a holiday table with bowls of felted wool acorns as a tribute to all natural and eco-friendly. For a romantic dinner one can always hang acorns on a beautiful tree branch in a vase, lit a few candles and voila you've got a perfect date!
There are so many ways how wool felted acorns could decorate your house! Just use your imagination and you will add uniqueness and style to your sweet home!
Thursday, October 14, 2010
Halloween countdown gifts on Etsy
It's Halloween countdown and we already started decorating our house for the upcoming holiday. My kids are very excited and a bit frightened by all the spiders and witches hanging on our neighbors' doors. It's a lovely holiday and so much fun for both kids and grown-ups. I picked up a few nice Halloween gift and decoration ideas on Etsy to share with everyone looking forward to this great holiday!
I featured the following wonderful Etsy artists in my collection:
CheekieBottoms, FleetingStillness, KarisaGraphic, YuliaKazansky, TonyaUtkina, bumblestore, honeypunk1, TomBjornDesigns, FineEmbroidery, ArtHarmony, socksandmittens, CityCrochet, cushyadornments, katrinshine, graphicland, CuffeShop

