Thursday, October 10, 2013

DIY Cute Pumpkins for Halloween

We will felt a few cute pumpkins for Halloween. Our pumpkins could be great gifts for friends and family. They will look wonderful in your living room or your kitchen as signs of beautiful Autumn and approaching Halloween.


We will need some orange felting wool, a glass of water and a piece of soap, black thread and a needle. We will felt our pumpkins with water and soap so it makes sense to do it on surfaces that don't get damaged by water. A kitchen table should be a good place once it's covered with a water resistant tablecloth. You won't need too much space. The amount of water you will use is minimal.


Take a piece of orange wool and form a ball in your hands. Water your wool and add some soap to it. Now gently squeeze the piece of wool a few times. Start rolling it between your palms. Keep rolling for 5 to 10 minutes adding water and soap if needed.


Once your ball has become somewhat firm and solid rinse it well and let it dry. The goal is to make the ball not too firm so that you will be able to get a needle through it once it's dry.


Once your orange ball is dry it's time to turn it into a pumpkin. Take a black thread and a needle. Start in the middle of the orange ball adding loops around it. Six loops should be OK. At the end it makes sense to add an extra loop to serve as a hanging thread.


It's an easy DIY project that produces a great result. You will have bright and cute pumpkins made of natural materials. They could serve as small Halloween gifts for your friends.

Thursday, September 27, 2012

DIY How to recycle wool scraps

I felt a lot of scarves, bags, brooches and, thus, I have a huge bag of wool scraps. The bag sits on my shelf. It's not heavy but takes a lot of my space! To somehow use all these bright and cool scraps I came up with an idea to turn them into felted wool brooches. Scraps will serve as an organic filler to make my brooches nice and puffy.

wool scraps

I have many scraps of different colors as I felt scarves in different techniques using different types of felting wool. Wool scraps are very nice to touch and they are totally eco friendly. I first decided to separate them into small piles by their color.

multicolored wool scraps

To make a wool felted brooch I cover a handful of wool scraps with felting wool and felt it in soapy warm water. As a result I get a base for my brooch that pretty much looks like a white pebble stone.

felted wool made of wool scraps

Once the brooch base is ready, I let it dry. Now it's time to turn it into something unique and beautiful. I embroidered a tree of life design adding small glass beads in blue, red and green. It's a great opportunity to use your imagination and come up with something totally different and special!

tree of life folk wool brooch felted from scraps


Thursday, September 20, 2012

DIY How to make felted wool mini bag

We are surrounded by bright and colorful autumn leaves and berries. Fall is such a beautiful season! It would be nice to make a vivid Fall accessory to remind us of these amazing few months. I've created this mini bag using felting wool of different colors. Red berries look a bit like bright mountain ash berries in the Fall.

My Giveaway: Red Berry felted mini bag

mountain ash red berry felted mini bag

To make a hand felted mini bag you will need white wool, water, soap and bubble wrap paper. To create a picture design on your pouch it would be great to have additional feting wool of different colors. For a strap you can always use a rope or hand crochet one of a white cotton thread.

felting white wool

As the very first step cut out a rectangular piece of bubble wrap paper. You will use the rectangular piece to create your mini bag. Depending on the desired size of your future mini bag increase the size of the cut out by about 30%. Do not forget that wool will shrink as a result of felting.

hand felting a mini bag

On a large piece of bubble wrap paper arrange pieces of white wool to form a rectangle. The size of the wool rectangle should be a bit bigger than the size of the plastic cut out. Lay out at least two layers of wool on top of each other for your mini bag to turn out firm and durable.

On top of the white wool rectangle put your plastic cut out. The wool rectangle should be slightly bigger than the cut out. You will use that extra wool to form bag's sides. On top of the plastic rectangle lay white wool. You will get a wool rectangle with a plastic cut out inside.

wet felting white woolalt=

Wet the wool with soapy water. Bend white wool on both sides and at the bottom to form a bag. Cover the wool with a large piece of bubble wrap paper and start carefully rubbing the plastic paper.

To make a picture design arrange pieces of dyed wool into a desired design and cover with a large piece of bubble wrap paper. Felt until the wool fibers attach and form a firm and homogeneous piece. Rinse your rectangular piece well and let it dry overnight.

To turn you felted rectangular piece into a mini bag attach a button or hand felted bead and a strap. To make it easy use a rope as a strap.

red berry pouch bag


Sunday, September 9, 2012

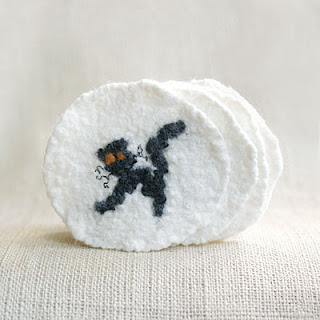
DIY How to make Halloween black cat felted coasters

It is so much fun to decorate your home for Halloween. If you have children it is even more fun as they usually love Halloween and craft projects that go with it. I have come up with an idea of making Halloween themed glass coasters. I already tried scary pumpkins. This time around I'll put a black cat on my coasters.

Halloween black cat coasters

To make felted wool coasters we will need white, black and orange felting wool, water, soap and bubble wrap plastic paper.

On a piece of bubble wrap plastic paper arrange pieces of white felting wool so that they form a circle. You can put one layer of wool for future coasters to be thin or a few layers for them to be thicker. Don't forget that wool will shrink by about 30%. Depending on the size of future coasters add 30% to their original size.

Halloween black cat felting

Once the white circle is there start working on a black cat. Let one piece of black wool be the cat's tail, another - its back. Form a circle out of black wool and make the cat's head. Decorate your cat with additional features like orange eyes, whiskers made of black thread, etc. Use your imagination to make your cat funny, scary or cute! It's important you arrange all the details carefully so that they don't mix up later on.


Once the cat is ready start felting. To felt add soapy water and cover the wool with another layer of bubbled wrap paper. Make sure the original image of the black cat stays as much intact as possible. Start carefully rubbing the plastic paper. Felting shouldn't take long. Once all the wool fibers attach to each other the coaster is ready.


Rinse your coasters well and let them dry overnight. If you wish to make more that one coaster keep in mind that it's almost impossible to completely replicate your original image. You can more or less follow the steps of replicating your original design but at the end all cats will look different. If you love handmade and are ready for all your cats to look special and different go for it!


Friday, September 7, 2012

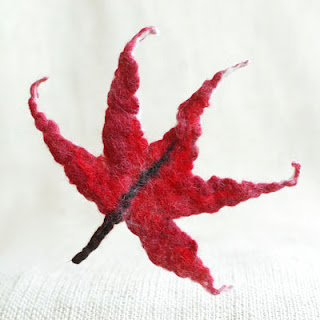
DIY How to make a maple leaf brooch

Let us make a felted brooch in a shape of a maple tree leaf. Autumn will be here before we know it. Fall inspired accessories will look great on our coats and outerwear. The maple leaf brooch is relatively easy to make. You will need a table to put a piece of bubbled wrap paper. It's great if the table's surface can endure water and soap as with felting you will get your table wet.

Red maple leaf

You will need felting wool in red, burgundy and brown. For felting you will need soap, water and bubbled wrap paper.

red burgundy felting wool

On a piece of bubbles paper arrange five pieces of burgundy red felting wool. They will be our maple leaves. In the middle add a piece of brown wool. To add color put a few small pieces of bright red wool here and there. I suggest you experiment with colors and add a bit of green, black, dark brown or ever blue. Colors will add volume to the leaf and make it look bright.

felting red maple leaf

Once the leaf is arranged wet it with soapy water and cover with another piece of bubbled wrap. Start gently rubbing the plastic paper. The leaf is felted when all the wool fibers stay intact and attached to each other.

Hand felted red maple leaf

The brooch is almost ready. Rinse it well in water and let it dry. Attach a safe pin at the back of the leaf to turn it into a brooch. You can wear this brooch with pretty much any outfit. It will look great on winter coats and outerwear.

red burgundy maple leaf brooch


Sunday, September 2, 2012

DIY How to make Halloween ghost home decoration

Some of us will most probably decorate our homes for Halloween. I would like to share an idea of a DIY project of making felted ghosts for Halloween.


We will need white and black felting wool, a glass to use as a form, soap, water and a piece of bubbled wrap paper.


On a piece of bubbled wrap paper put an empty glass upside down. Slowly start to cover it with white wool. It makes sense to water the surface of the glass beforehand so that our pieces of wool could stick to it. Once the glass is all covered with wool it's time to wet our wool with soapy water. It makes sense to water it slowly so that our wool doesn't fall off the glass and stays there covering it nicely. Once white wool is wet we can start making our ghost's "face".


With a piece of black wool make an eye and attach it to our white ghost. It's much fun to experiment with sized and eye position as our ghost's face expression will change dramatically depending on what shape and size ghost's eyes will be.

Once all the wool pieces are at place we can start the felting process. Carefully wrap bubbled paper around our glass and start rubbing it. Be gentle so that our wool doesn't fall off the glass. Once wool fibers become inseparable and our white form turns into a firm piece of felted wool it's time to rinse it.

To dry it well I let it sit on a glass overnight. Thus, the original form of the glass will be preserved and whet our ghost is nice and dry it will stay firm and round. I've attached a thread on top of it so that I could hang it anywhere in my room or outside. My little white ghost turned out to be not scary at all. But it's all in your own hands. Designing the ghosts face is the most creative part of the whole process!


Monday, June 4, 2012

GIY Tutorial How to make felted bracelet with buttons

I still have some buttons left from my crocheting adventure. I don’t like nice items to rest idle on my working table in my studio so I came up with an idea of a felted bracelet with buttons.
To make the bracelet we will need undyed felting wool, buttons of different colors and sizes, bubble plastic wrap, a needle and a white thread.


I first started with felting a bracelet. If you don't feel like felting today you can always buy a prefelted wool in any of craft and supplies stores. If you decide to go with a prefelted piece just cut a rectangle shaped piece out of a prefelted wool. The measurements could be about 2 and ½ inch by 9 and ½ inch.


I prefer to felt a bracelet myself as, thus, I’m able to make it as soft and thin as I wish.

On a bubble wrap piece of paper I lay out pieces of wool to form a rectangle. The rectangle will later turn into the bracelet. Since the wool will shrink I make the rectangle about 30% bigger that the original size. I’ll go with about 3 and ½ inch by 12 inch shape this time.


Once the rectangle is formed I wet it with clear water and add soap. Liquid soap should be fine. Once the piece is all wet and soapy I cover it with the rest of bubble plastic paper and start the process of felting. I stroke and rub the plastic helping wool fibers to bind and felt. When the wool has felted I rinse my bracelet in clear water and let it dry completely.


On my bracelet I lay out buttons of different sizes and colors. I can color coordinate them and add some extra buttons here and there for the pattern to look the way I want it to be.

I sew on buttons one by one with a needle and white thread. It makes sense to sew largest buttons first. It will help you preserve the original pattern and distribute buttons evenly on the bracelet.


Once all the buttons are on the bracelet it’s time to make a snap. One of the buttons can easily be used as a snap. Just make a cut on the opposite side of the bracelet for the button to fit in.

The bracelet looks bright and unique! It can be a great gift for someone who loves buttons. One can always substitute simple buttons with vintage ones or use dyed wool instead of white one as a base.

Happy crafting!


Saturday, June 25, 2011

Tutorial How to make hand crocheted necklace with buttons

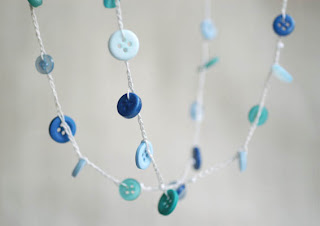
I've recently came across a large bag of multicolored buttons in a crafts store and just could not stop myself from buying one. The buttons are of different sizes, shapes and hues of blue and green. They are great for a hand crocheted summer necklace.
To make a necklace we will need a mercerized cotton thread, a toggle clasp, a crochet hook and about 30 buttons of different sizes and colors. To make crocheting simple and to safe us some time we will start with beading all out buttons on a thread first. Once all our buttons are ganging there nicely we can start crocheting.

I'll crochet a simple foundation chain adding buttons with 1 or 1 and 1/2 inch. intervals. In case you would like to make your necklace longer you can add some more buttons or make a space between them larger. I like to mix and match hues of green and blue so that the necklace looks unique and stylish.
TonyaUtkina shop
I plan on crocheting 34 inch. necklace so that I could wear it either on my neck or my arm. Some people wear crocheted necklaces on their waist instead of a belt or on their ancle.
The necklace crocheting shouldn't take more than 15 minutes. When the thread is ready we will attach toggle clasp to it and our summer bright necklace is ready to wear. It's a perfect summer accessory and will make you look beautiful and special!
happy necklaces

Monday, May 23, 2011

How to dye in green with blue and yellow drink mixes

Since I bought Kool Aid brink mix in blue raspberry I now have all prime colors I need for dyeing. I am eager to start experimenting with mixing different colors and creating new ones. My first experiment will be in mixing a bright green color. We will need one pack of yellow drink mix. For that we can use lemon Kool Aid. In addition we will need a blue drink mix and blue raspberry Kool Aid works just fine.
green felting mix
I mix both drinks in a plastic container. It makes sense to first make a yellow mix and start slowly adding blue drink mix into the container with yellow water. Keep stirring for colors to mix well. I suggest you do it slowly so that you can control the hue of green and stop when you think the color of the mix is the one you are looking for. I've noticed that for a pack of yellow mix I used about 2/3 the blue one.
dyeing in green with drink mix
I dyed my hand felted white wool pieces in the mixture of two drinks and got brightly colored green stripes.
Now it's time to turn them into something nice and beautiful. I assembled white and green pieces of wool on a base that I hand crocheted from jute earlier. The green color turned out to be even better than I've expected. It's a true positive and happy green. The brooch is bright and vivid making it a great accessory.
dyeing in green drink mix

Thursday, May 19, 2011

How to dye with a bright blue Kool Aid drink mix

I finally found the bright blue drink mix I was looking for. The Kool Aid drink mix in blue raspberry has exactly the color I needed to create happy blue items for my on-line shop. It's not easy to get by in local supermarkets. For some reason stores normally don't carry this particular color. However, one can always buy it on the Internet.
CityCrochet felting
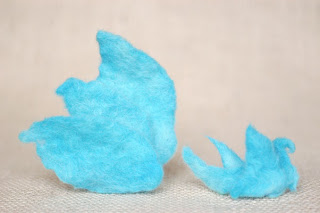
To dye with blue drink mix you will need to create felted wool layers first. We will felt white wool and dye it later. To learn about felting you are always welcome to read my earlier post on how to hand dye a flower brooch. When the layers are ready just pour water in a plastic container with blue drink mix and stir it well. Place all your layers in the container and microwave until it starts boiling.
CityCrochet elted scarves
Let your bright blue felted wool layers cool as they are extremely hot in the beginning and gently squeeze the wool until somewhat dry. I usually let my wool dry overnight.
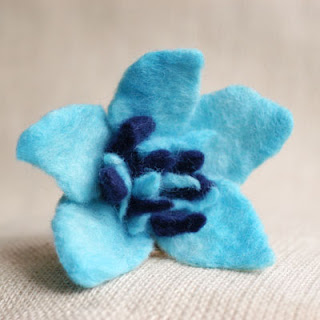
When our bright blue layers are ready we can use them to create a brooch. I personally like to mix colors so to create my brooch I added a few layers of dark blue hand felted wool. The result is a bright and vivid brooch that will go well with happy colors of the summer.
hand felting CityCrochet