Sunday, June 2, 2013

How to make a new upcycled necklace from an old one

I've recently bought a vintage necklace that looked rather old style and dusty. However, the beads were of high quality and of a very pretty color. They reminded me cranberries of all sizes and shades of red. I decided to upcycle the vintage necklace and turn it into something more contemporary and hip.


First of all I cut the necklace with a help of regular scissors to free up beads. I was lucky that the base of the necklace was a regular cotton thread and not a metal wire.
Beads looked very nice but were a bit dusty. I washed them with soap and left them to dry.


Once dry I put my beads in a glass jar. They looked so pretty with light coming through the jar and making beads shine. Beads are of all shades of red and of different sizes. I decided I won't use metal beads that were originally a part of the necklace. I'll to save them for a later project.


To crochet a new and hip necklace I used a crocheting hook and a super thin light blue thread. The combination of bright red and light blue looked super pretty! For a start I threaded all the beads mixing up sizes and colors. It saved me time and made the process of crocheting a necklace easier.


Having so many beads I was able to crochet a long necklace. It's really great as I'll be able to wear it not only as a necklace but as a bracelet, a belt or a head accessory. I crocheted a simple foundation chain adding red beads about every inch. The necklace crocheting took about 15 minutes. When the necklace was ready I attached a toggle clasp to complete the work.

It looks bright, hip, and very different from the original vintage necklace I bought. The new necklace is a perfect summer accessory! I'm especially happy I could reuse something I already had and turn it into something new.


Monday, February 25, 2013

Creative accessories handmade by Natalia Sinelnik

It's so much fun to come across a truly talented and creative person who makes one of a kind, bright and happy accessories. I stumbled upon Natalia Sinelnik's on-line shop Nathings while looking for bright accessories for spring and summer.


Could you please tell us a bit about yourself?
I was born in a Cossack family at the South of Russia in Krasnodar region. After graduating from a local art and design school with a diploma in interior design I worked as an architect in Adidas in Moscow. That was a great experience but I decided I have to strike it out on my own eventually. I switched to visual arts mostly photography and painting (watercolors). On top of this I knit and sew a lot as it's something I've been doing all my life. I sketch my own designs and hand make accessories for my friends and family.


How did you start?
My wonderful mom knows how to professionally sew, knit and crochet. She taught me all her secrets so that they are not lost eventually. I remember myself operating a small treadle sewing machine at the tender age of 6. What my mom couldn't teach me I learned by reading books and magazines. I've always been making fashion items for myself. But my true passion is lady's hats. Since I was 16 I've been making one or two hats for myself every year. I've accumulated a wonderful collection of beautiful and unique hats at my house.


What are your main sources of inspiration?
I love to travel. Every time I'm in a new place I try to go to all the local museums to learn about local artists. If I cannot take pictures for some reason I always sketch the ornaments and patterns in my sketch book. I love the history of fashion. Early 20th century is my favorite time. I love Art Deco, Russian Modern, Flapper style and the silent movies era. I research millinery (hats' fashion) archives as many of the secrets of the hats' craftsmanship are unfortunately lost. Those who make hats today have to reinvent some of the hat making techniques and come up with their own now hows.


What fibers do you use? For the summer accessories I prefer cotton and linen. For winter items I mostly use silk, velvet and wool. I like to experiment combining different fabrics with hand felted wool, hand knitted and crocheted pieces. It works well to add buttons, ribbons, etc. to accent a piece. I've recently got a new mannequin head for my hat making. I'm in a process of creating my summer hat collection that will be just amazing!


Monday, June 11, 2012

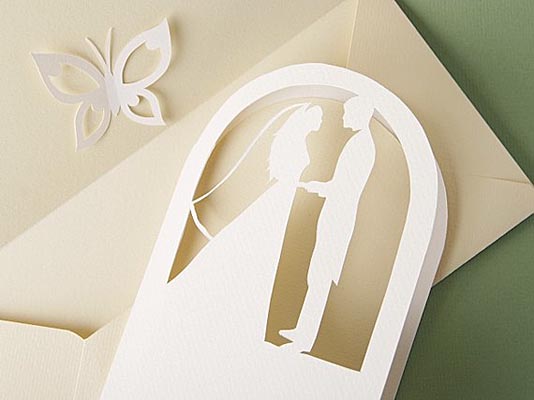
Wedding invitations and stationary by MamaTita

Summer months are ideal for weddings. Beautiful weather, flowers and the overall vacation mood make summers a perfect time for a wedding. With these thoughts in mind I came across a talented artist Nadezhda from MamaTita who makes wedding invitations and stationary. Nadezhda was very kind to talk to me about her art of making paper cutouts for weddings.


Can you tell us a bit about yourself?
My name is Nadezhda and I currently live in Latvia, Europe. I’m a very creative and artistic personality, although I don’t have a degree in either design or art. On one hand I’ve always dreamed about becoming a professional actress and an improviser. On the other hand I always longed for a family and children. Being a realistic person I perfectly understand that it’s hard to be a successful actress and a full time mom at the same time. After having my son I’ve shelved my theatrical plans and devoted myself to my family. All my creativity and artistic inspirations are now being channeled into my wedding invitations and stationary business.


How did you start making paper cutouts?
I always loved paper. Paper is a very rewarding material. Its flexibility and functionality opens up a lot of possibilities for creativity. The supply of art paper on the market is unbelievable and it very much helps in making the creative process more productive and rewarding.

The art of origami always fascinated me as well. As a hobby I buy tones of books about origami and create very sophisticated and intricate origami pieces.


What inspires you?
I’m always looking for new card stock and paper. There are so many amazing paper products out there and they serve as a huge source of inspiration for me.

Once I have a new idea in my head I rush to turn it into a finished product. I cannot usually wait till all the details of a new project sort out in my head. I need to act immediately. I create new designs step by step fixing and improving them on the go.

I’ve recently started experimenting with self hardening clay. I create cake toppers and other items for weddings out of the clay. Clay objects have very smooth surfaces and the material is very nice to touch and work with.


Thank you, Nadezhda!


Monday, June 4, 2012

GIY Tutorial How to make felted bracelet with buttons

I still have some buttons left from my crocheting adventure. I don’t like nice items to rest idle on my working table in my studio so I came up with an idea of a felted bracelet with buttons.

To make the bracelet we will need undyed felting wool, buttons of different colors and sizes, bubble plastic wrap, a needle and a white thread.


I first started with felting a bracelet. If you don't feel like felting today you can always buy a prefelted wool in any of craft and supplies stores. If you decide to go with a prefelted piece just cut a rectangle shaped piece out of a prefelted wool. The measurements could be about 2 and ½ inch by 9 and ½ inch.


I prefer to felt a bracelet myself as, thus, I’m able to make it as soft and thin as I wish.

On a bubble wrap piece of paper I lay out pieces of wool to form a rectangle. The rectangle will later turn into the bracelet. Since the wool will shrink I make the rectangle about 30% bigger that the original size. I’ll go with about 3 and ½ inch by 12 inch shape this time.


Once the rectangle is formed I wet it with clear water and add soap. Liquid soap should be fine. Once the piece is all wet and soapy I cover it with the rest of bubble plastic paper and start the process of felting. I stroke and rub the plastic helping wool fibers to bind and felt. When the wool has felted I rinse my bracelet in clear water and let it dry completely.


On my bracelet I lay out buttons of different sizes and colors. I can color coordinate them and add some extra buttons here and there for the pattern to look the way I want it to be.

I sew on buttons one by one with a needle and white thread. It makes sense to sew largest buttons first. It will help you preserve the original pattern and distribute buttons evenly on the bracelet.


Once all the buttons are on the bracelet it’s time to make a snap. One of the buttons can easily be used as a snap. Just make a cut on the opposite side of the bracelet for the button to fit in.

The bracelet looks bright and unique! It can be a great gift for someone who loves buttons. One can always substitute simple buttons with vintage ones or use dyed wool instead of white one as a base.

Happy crafting!


Thursday, May 31, 2012

Summer jewelry by Alery

When I first saw colorful earring and pendants by Alery I instantly fell in love! Bright summer colors of Alery earrings radiate positive energy and make me think about ocean vacation, exotic flowers and refreshing cocktails at a beach.
I was curious about the technique and materials these bright pieces are made from. Thus, I simply had to talk to Avery and share what I’ve learned.

Could you please tell us a bit about yourself?
My name is Valery and I was born and raised in Kiev, Ukraine. It’s a beautiful city with rich history and beautiful ancient churches. A few years ago my husband, our two children and I moved to California where we now live in a small city not far from San Francisco. I work in IT but in my spare time I turn into a jeweler.


How did you start?
I’ve always been into crafting and art. Over years I’ve tried different crafts, techniques and fibers. Finally jewelry making became my main passion. I started about six years ago with incorporating precious stones and beads into my jewelry. Later I moved to wire wrapping techniques and metal. Nowadays I mostly work with hot enamel. I love to experiment and to incorporate completely different techniques into my creative process.


What are your main sources of inspiration?
On one hand I’m inspired by the diversity and sophistication of nature. One can indefinitely contemplate intricate creations of nature finding something new and surprising every time.

On the other hand man made objects can be as beautiful. Apart from nature architecture and art serve as great sources of inspiration. The simplicity and elegance of minimalism where every shape and every line have a well defined meaning and purpose prompt me to create simple yet bright and colorful jewelry items.


Could you tell us about the technique you use in jewelry making?
The technique I use is called enameling. A metal surface is covered with a finely grounded glass powder. The surface is then heated to about 1450F so that the powder melts and fuses together. One can use either kiln of hand torch to heat the powder.

It usually takes a few melting iterations for a jewelry piece to be ready. With each iteration a jeweler can change the color of the glass powder, its quantity and transparency. As a result most of the pieces turn out to be one of a kind and completely unique as it’s simply impossible to replicate them.

The process of enameling offers a jeweler a lot of freedom for creativity and experimentation. The results are sometimes very surprising and unpredictable. I totally love it!


Monday, May 21, 2012

DIY How to make felted watermelon earrings

To make bright and happy summer inspired watermelon earrings we will need felting wool in bright red, green, white and black, soap, pure water and bubbled wrap paper.


To make a watermelon we will need to lay out wool in a shape of “hot dog”. First we cut a piece of red wool of about 5 inch. We mix red wood with a bit of black wool to make it look like our watermelon has seeds. On top of red wool we lay white and than green wool. As a result we will have a green wool “hot dog” that inside will have red, black and white wool.


Once our “hot dog” is formed we wet is with water and soak it in soap. As it gets wet and soapy we start rolling in on a piece of bubbled wrap. We roll it on a plastic wrap for about 15 minutes until it gets firm. The wool will shrink by about 30%. Let our felted piece dry well.


Our next step will be to cup our “hot dog” into equal parts. You can cut it with scissors. As a result we will get round pieces of felted wool that will look like freshly cut watermelon. If you attach pieces of felted watermelon to simple earrings hooks you will get nice and fresh watermelon earrings.


The watermelon earrings look fun and bright. They will be a truly hand made item as I doubt you can buy anything like that in a jewelry store. The fact that you've created them with your own hands will make watermelon earring even more special.


Saturday, July 2, 2011

Summer Wedding Essentials contest results

Russian Artists team on Etsy just had its Summer Wedding Essentials contest. Fifty six team shops took part in the contest submitting their hand made wedding-themed items. All of the entries were fantastic! They can be checked out at Russian Artists Facebook Page.

Although all of the items submitted were amazingly beautiful, creative and unique, I picked up a few of my personal favorites. All of the wonderful items presented will make any wedding an unforgettable experience!

1. Dog Crochet Wedding Floral Collar by mailo


2. Event Decor for the Wine Glass by MamaTita


3. Tea Set, Original decorative painting by Yury Tarler


4. White earrings with pearls by HoneyCase2

Saturday, June 25, 2011

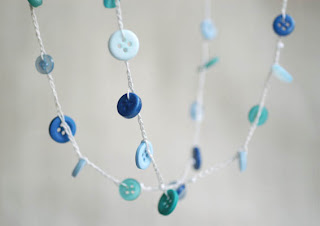
Tutorial How to make hand crocheted necklace with buttons

I've recently came across a large bag of multicolored buttons in a crafts store and just could not stop myself from buying one. The buttons are of different sizes, shapes and hues of blue and green. They are great for a hand crocheted summer necklace.
To make a necklace we will need a mercerized cotton thread, a toggle clasp, a crochet hook and about 30 buttons of different sizes and colors. To make crocheting simple and to safe us some time we will start with beading all out buttons on a thread first. Once all our buttons are ganging there nicely we can start crocheting.

I'll crochet a simple foundation chain adding buttons with 1 or 1 and 1/2 inch. intervals. In case you would like to make your necklace longer you can add some more buttons or make a space between them larger. I like to mix and match hues of green and blue so that the necklace looks unique and stylish.
TonyaUtkina shop
I plan on crocheting 34 inch. necklace so that I could wear it either on my neck or my arm. Some people wear crocheted necklaces on their waist instead of a belt or on their ancle.
The necklace crocheting shouldn't take more than 15 minutes. When the thread is ready we will attach toggle clasp to it and our summer bright necklace is ready to wear. It's a perfect summer accessory and will make you look beautiful and special!
happy necklaces

Friday, June 10, 2011

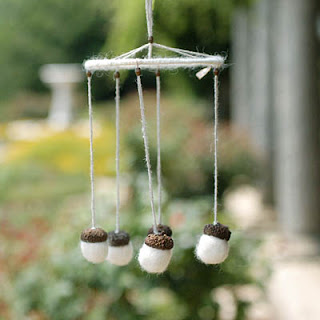
Summer wedding decorations white acorn wind chime

This year summer is all about weddings! It's not only about Mr. and Mrs. Wales' one but about all those wonderful couples that are having a moment of their life this summer. Interestingly the color scheme is not always white. This summer purple, lilac, green, pink, turquoise and aqua colors are en vogue. Even yellow and orange somehow fit into the perfect wedding color palette.

The selection of decoration ideas and wedding gifts offered by numerous on-line shops is outstanding. I thought I would share with you one decoration idea that came to my mind and that I created using felted acorns, wire and cotton thread.
felted accessories
Wind charms and mobiles look great as garden decoration. Why not to use them as a wedding ornament? White acorns with real acorn tops are attached to a round base. They quietly swing and wave in the wind adding style and elegance to wedding arrangements.
crocheted and felted accessories
The acorns could be of any color. Bright blue acorns would accent white of the bride's dress. Lemon yellows would play well with bright green of the surrounding landscape. Not too overriding acorn wind chimes will add flair to any summer wedding.
wedding decor

Thursday, June 2, 2011

Blue and chocolate felted flower brooch

I continue experimenting with hand dyeing. It's such a fun process and I just love the colors that turn out at the end. To create my chocolate blue flower felted brooch I first hand felted flower petals in white and dark brown. I had all three types of wool available at home.
citycrochet accessories
To add color to my brooch I hand dyed each felted petal with blue drink mix which contains food coloring. As the result my petals have spots of bright blue to contrast their dark brown color and they smell like raspberry. My pieces of hand felted wool look so different now. Bright blue color makes them vivid and summer-like.
felted necklaces
After assembling all my hand dyed pieces into a flower and attaching petals to a hand crocheted jute base I've got an exotic flower brooch in blue, dark brown and white. It will go well with any neutral or white outfit and will add color to a business casual dress.
felted brooches

Wednesday, June 1, 2011

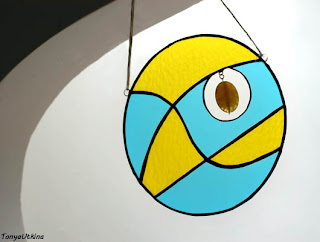
Summer suncatcher by FleetingStillness

I've recently received an amazing gift from a very talented stained glass artist FleetingStillness who lives and works in Maryland.

It's always nice to receive gifts from fellow artists who are members of vast and diverse hand made community. When such gifts turn out to be beautiful hand made pieces of art it's twice as nice!
stained glass suncatchers
I always had a soft spot for pieces made of glass. I praise glass for its transparency, variety of colors and opportunities for creativity. The suncatcher I've got is made of bright yellow and blue glass and a copper foil. It was created in a "Tiffany" style meaning no lead was used to attach pieces of glass.
glass objects
The suncatcher is a perfect summer gift. The sun shines through brightly colored glass lighting up everything around and making me happy! Yellow and blue colors are of the warm sea, sand beaches and vacations! This piece of art will always remind me of the summer. From now on I'll have a small part of an ocean beach in my room.
glass candle holders

Alla, thank you for such a great gift!