We will make a Christmas gift that is an easy and simple DIY project.
We will need a wooden bracelet, a few nail polishes and a roll of masking tape.
The wooden bracelet should be plain wood. Such bracelets could be purchased on-line or in craft shops. I suggest you try it on before starting a project. It would be a disappointment if once you finish painting your bracelet won't fit.

Look at your nail polish collection and select a few nail polishes that match. We will use them as our paint. They are very durable and have a nice luster.
Masking tape will help us paint the pattern we design.

To start apply masking tape to the bracelet. Make sure the tape is adhered well to the wooden bracelet. Otherwise you will have paint spills and the bracelet will look messy. I will paint a pattern of stripes on my bracelet, thus, I'll apply the tape so that there are stripes of untreated wood. I'll leave 4 or 5 untreated wood stripes on my bracelet. Now color wooden stripes with the same hue of nail polish.

Once the polish is dry slowly remove the masking tape. You will see nice colored stripes on the bracelet. Now apply a new set of masking tape to color the bracelet with a new nail polish shade. Repeat as many times as nail polish colors you have.
Make sure the nail polish is dry and the masking tape is adhered well.

I like to mix colors without any rule or pattern, thus, a dark red color may be followed by a golden hue and then by a dark purple one. Then I change the order. I change stripe sizes as well to make my bracelet look special and creative.


Monday, September 30, 2013
Christmas gift ideas
Sunday, June 2, 2013
How to make a new upcycled necklace from an old one
I've recently bought a vintage necklace that looked rather old style and dusty. However, the beads were of high quality and of a very pretty color. They reminded me cranberries of all sizes and shades of red. I decided to upcycle the vintage necklace and turn it into something more contemporary and hip.

First of all I cut the necklace with a help of regular scissors to free up beads. I was lucky that the base of the necklace was a regular cotton thread and not a metal wire.
Beads looked very nice but were a bit dusty. I washed them with soap and left them to dry.

Once dry I put my beads in a glass jar. They looked so pretty with light coming through the jar and making beads shine. Beads are of all shades of red and of different sizes. I decided I won't use metal beads that were originally a part of the necklace. I'll to save them for a later project.

To crochet a new and hip necklace I used a crocheting hook and a super thin light blue thread. The combination of bright red and light blue looked super pretty! For a start I threaded all the beads mixing up sizes and colors. It saved me time and made the process of crocheting a necklace easier.

Having so many beads I was able to crochet a long necklace. It's really great as I'll be able to wear it not only as a necklace but as a bracelet, a belt or a head accessory. I crocheted a simple foundation chain adding red beads about every inch. The necklace crocheting took about 15 minutes. When the necklace was ready I attached a toggle clasp to complete the work.
It looks bright, hip, and very different from the original vintage necklace I bought. The new necklace is a perfect summer accessory! I'm especially happy I could reuse something I already had and turn it into something new.


Monday, June 4, 2012
GIY Tutorial How to make felted bracelet with buttons
I still have some buttons left from my crocheting adventure. I don’t like nice items to rest idle on my working table in my studio so I came up with an idea of a felted bracelet with buttons.
To make the bracelet we will need undyed felting wool, buttons of different colors and sizes, bubble plastic wrap, a needle and a white thread.

I first started with felting a bracelet. If you don't feel like felting today you can always buy a prefelted wool in any of craft and supplies stores. If you decide to go with a prefelted piece just cut a rectangle shaped piece out of a prefelted wool. The measurements could be about 2 and ½ inch by 9 and ½ inch.

I prefer to felt a bracelet myself as, thus, I’m able to make it as soft and thin as I wish.
On a bubble wrap piece of paper I lay out pieces of wool to form a rectangle. The rectangle will later turn into the bracelet. Since the wool will shrink I make the rectangle about 30% bigger that the original size. I’ll go with about 3 and ½ inch by 12 inch shape this time.

Once the rectangle is formed I wet it with clear water and add soap. Liquid soap should be fine. Once the piece is all wet and soapy I cover it with the rest of bubble plastic paper and start the process of felting. I stroke and rub the plastic helping wool fibers to bind and felt. When the wool has felted I rinse my bracelet in clear water and let it dry completely.

On my bracelet I lay out buttons of different sizes and colors. I can color coordinate them and add some extra buttons here and there for the pattern to look the way I want it to be.
I sew on buttons one by one with a needle and white thread. It makes sense to sew largest buttons first. It will help you preserve the original pattern and distribute buttons evenly on the bracelet.

Once all the buttons are on the bracelet it’s time to make a snap. One of the buttons can easily be used as a snap. Just make a cut on the opposite side of the bracelet for the button to fit in.
The bracelet looks bright and unique! It can be a great gift for someone who loves buttons. One can always substitute simple buttons with vintage ones or use dyed wool instead of white one as a base.
Happy crafting!

Wednesday, May 16, 2012
DIY How to make city style felted bracelet
The color combination of pure white and brown is my favorite. Accessories in white and dark chocolate look stylish and classy. They go well with business or casual outfits.

To create a bracelet we will need felting wool in white and brown and wooden beads. We will also need a piece of bubbled plastic wrap paper, soap and clear water.

I first start with felting a white bracelet. On a bubble wrap piece of paper I lay out pieces of wool to form a rectangle. The rectangle will later turn into the bracelet. Since the wool will shrink I make the rectangle about 30% bigger that the original size.
Once the rectangle is formed I wet it with clear water and add soap. Once the piece is all wet and soapy I cover it with the rest of bubble plastic paper and start the process of felting. I stroke and rub the plastic helping wool fibers to bind and felt.
When the wool has felted well I rinse my bracelet in clear water and let it dry completely. With a piece of brown wool I make a felted bead by rolling a wetted and soapy piece of brown wool between my palms.
Once my bracelet is ready I needle down brown wooden beads. The color of wooden beads matches the color of the brown felted bead nicely!

The bracelet turned out to be very soft, thin and light. It's made of all natural materials and is very pleasant to wear. The felting technique is very eco-friendly as to felt an item one just needs some water and a bit of soap. No chemicals are used in the process of felting. To wear the bracelet one simply has to fasten the brown button.

Friday, May 20, 2011
Dyeing hand felted bracelet with blue Kool Aid
Since I bought plenty of blue colored Kool Aid on line I continue experimenting with dyeing different hand felted items in bright blue. This time I decided to create a hand felted bracelet.
I first hand felted eight beads mixing white and dark blue wool. To read more about how to make wool beads please visit my earlier post.
To create a blue dyeing mixture I poured Kool Aid blue raspberry drink mix into a plastic container with water. It's important to stir the mixture well before soaking beads in it. Thus, the color will be applied equally on all the beads.
When my dyeing mixture is ready I placed all my eight hand felted wool beads into the container and microwaved it for about 3 minutes or until it starts boiling. Don't overheat the beads as they can get burned! Please be careful handling beads after the microwave as they get extremely hot!
My beads absorbed bright blue color. They now look like marbles with spots of light and dark blue.
Dyed beads could be turned into a necklace, a bracelet or a pair of earrings. I decided to create a jewelry set this time. First I made a bracelet chaining six beads together. I still have two blue beads left. They will look great as a pair of earrings.
The set is of bright colors of sea waters, ocean lagoon and sky. It's completely unique as beads were hand dyed and now have their own special color. That's the beauty of hand dyeing. It creates unique colors and special items!
Wednesday, March 30, 2011
Red Berry summer bracelet
I love bright colors of the summer: red as a berry, blue as the sky or the ocean, yellow as a sunflower. They bring so much positive energy and create a happy attitude. Besides we usually wear bright and airy dresses in the summer and it's always nice to complement them with equally vivid accessories. Bracelets are wonderful additions to any outfit as they are non-distractive and easy to wear. One can put a few of them to experiment and mix of colors. 
I usually make my bracelets of wire and Czech glass beads. I should admit the Czech beads are the best as they are of very good quality and come in huge selection of shapes and colors. This time I created bright red berry bracelet that looks fantastic on one's hand. It's not flashy but stylish, elegant and fits one's hand just perfectly. It could be a great wedding accessory or something a woman or a girl could wear every day.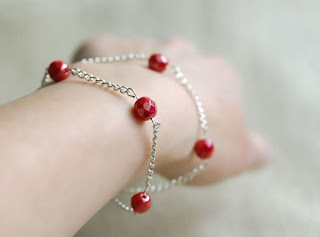
Tuesday, March 29, 2011
Clear glass beads summer bracelet
I went shopping the other day and bought a string of beautiful clear glass beads. Beads were so shiny and perfectly cut that I couldn't stop myself. Since I ended up buying these beads I had to create something out of them. It didn't take long to come up with a design of a summer bracelet.
Beads are of medium size. They are beautifully cut and sun light just shines through them. I wire wrapped glass beads adding some small dark gray ones to accent the color. The combination of clear glass and dark dots looks very stylish.
The bracelet I eventually created is simple yet elegant. It locks easily on one's hand and its size could be adjusted. The neutral color will go well with any summer dress or business casual outfit. The bracelet is of that clear color that will look perfect on a bride's hand. The combination of a beautiful white dress and transparent, pure beads should work very well! 
Friday, June 25, 2010
My first GIVEAWAY results
My first ever Giveaway ended yesterday, June 24th. Thank you so much for participating. I very much appreciate your time and attention!
I ran the number of comments through a random generator.
Let us congratulate Tina Reynolds who won the set of my handmade beach bracelets in berry cream sherbet!!!
Congratulations Tina!!!
Monday, June 14, 2010
Giveaway: Beach bracelets in berry cream sherbet
I so much like summer colors of pink, berry, strawberry, raspberry, sherbet and fuchsia. They add color to any summer outfit. In combination with grey these colors look very elegant and stylish. I handmade this set of three bracelets in pink for a summer at the beach. They are water resistant and easily adjustable. The bracelets attach well and will fit any wrist.
I'm hosting my first giveaway ever! One lucky giveaway participant selected by True Random Number Generator will win my handmade beach bracelets in berry cream sherbet next Thursday, June 24.To enter:
Please visit my Etsy shop TonyaUtkina and leave a comment about your favorite item in my Etsy shop. Don't forget to leave your e-mail address so I can contact you in case you win. Your e-mail info will NEVER be used for any other purposes!!! Extra entries:
Please leave one separate comment for each entry. (So if it is 2 extra entries for example, leave 2 comments, etc.)
1 entry - follow my blog with Google friend connect
1 entry - follow me on Twitter TonyaUtkina
1 entry per day - retweet the following message and post a comment about it (just copy and paste the following into the twitter window). Can be done daily:
RT @tonyautkina GIVEAWAY Beach Bracelets berry cream! Visit my blog http://www.tonyautkina.blogspot.com/2010/06/beach-bracelets-in-pink.html
2 entries - grab my button and put it on your blog
4 entries - blog about this giveaway
No purchase is neccessary, but if you happen to buy something you will get extra 5 entries .
Open to US and Canada only. Winner will be chosen by online random generator. Winner will be notified by e-mail on Thursday, June 24, 2010 and will have 3 days to reply or another winner will be chosen.
Good luck!:)
Monday, June 7, 2010
Beach bracelets blue green yellow

I love the summer colors of blue oceans, green mint from cocktails and yellow sun and sand. For a perfect day at the beach I've created this set of three colorful bracelets that are water resistant and adjustable. They will add color to your summer gowns and beach outfits.

