Thursday, October 10, 2013

DIY Cute Pumpkins for Halloween

We will felt a few cute pumpkins for Halloween. Our pumpkins could be great gifts for friends and family. They will look wonderful in your living room or your kitchen as signs of beautiful Autumn and approaching Halloween.


We will need some orange felting wool, a glass of water and a piece of soap, black thread and a needle. We will felt our pumpkins with water and soap so it makes sense to do it on surfaces that don't get damaged by water. A kitchen table should be a good place once it's covered with a water resistant tablecloth. You won't need too much space. The amount of water you will use is minimal.


Take a piece of orange wool and form a ball in your hands. Water your wool and add some soap to it. Now gently squeeze the piece of wool a few times. Start rolling it between your palms. Keep rolling for 5 to 10 minutes adding water and soap if needed.


Once your ball has become somewhat firm and solid rinse it well and let it dry. The goal is to make the ball not too firm so that you will be able to get a needle through it once it's dry.


Once your orange ball is dry it's time to turn it into a pumpkin. Take a black thread and a needle. Start in the middle of the orange ball adding loops around it. Six loops should be OK. At the end it makes sense to add an extra loop to serve as a hanging thread.


It's an easy DIY project that produces a great result. You will have bright and cute pumpkins made of natural materials. They could serve as small Halloween gifts for your friends.

Monday, September 30, 2013

Christmas gift ideas

We will make a Christmas gift that is an easy and simple DIY project.

We will need a wooden bracelet, a few nail polishes and a roll of masking tape. The wooden bracelet should be plain wood. Such bracelets could be purchased on-line or in craft shops. I suggest you try it on before starting a project. It would be a disappointment if once you finish painting your bracelet won't fit.


Look at your nail polish collection and select a few nail polishes that match. We will use them as our paint. They are very durable and have a nice luster. Masking tape will help us paint the pattern we design.


To start apply masking tape to the bracelet. Make sure the tape is adhered well to the wooden bracelet. Otherwise you will have paint spills and the bracelet will look messy. I will paint a pattern of stripes on my bracelet, thus, I'll apply the tape so that there are stripes of untreated wood. I'll leave 4 or 5 untreated wood stripes on my bracelet. Now color wooden stripes with the same hue of nail polish.


Once the polish is dry slowly remove the masking tape. You will see nice colored stripes on the bracelet. Now apply a new set of masking tape to color the bracelet with a new nail polish shade. Repeat as many times as nail polish colors you have. Make sure the nail polish is dry and the masking tape is adhered well.


I like to mix colors without any rule or pattern, thus, a dark red color may be followed by a golden hue and then by a dark purple one. Then I change the order. I change stripe sizes as well to make my bracelet look special and creative.


Thursday, June 13, 2013

DIY how to refresh an old necklace

I've recently bought an old necklace in a vintage store. It looked pretty dull and uninspiring but I somehow liked the beads and thought I could remake it into something fresh and new.


I first disassembled the necklace and separated all the beads into three piles. I washed all the beads thoroughly in a soapy water to remove all the dust. I dried the beads on a piece of paper.


I decided not to use red beads this time as I didn't really like the original combination of charcoal grey, golden and red. I put them aside for the next project. Instead I decided to go with gray and golden beads.


I threaded all the beads in a particular pattern with two gray beads followed by one golden bead. With a regular crocheting hook I crocheted beads one by one into a necklace.


The necklace is about 40 in. long and I can wear it as one or two strings depending on my mood and my dress:).


Since the necklace is rather long I can wear it as a bracelet or a head accessory. Its neutral colors go with pretty much any dress and it works ideal with a business casual or an office outfit.


Friday, February 8, 2013

Winter flower

I found this simple flower walking by my house on a snow day. The color combination chocolate brown flower on white snow caught my eyes. I simply couldn't walk by:)


Thursday, September 27, 2012

DIY How to recycle wool scraps

I felt a lot of scarves, bags, brooches and, thus, I have a huge bag of wool scraps. The bag sits on my shelf. It's not heavy but takes a lot of my space! To somehow use all these bright and cool scraps I came up with an idea to turn them into felted wool brooches. Scraps will serve as an organic filler to make my brooches nice and puffy.

wool scraps

I have many scraps of different colors as I felt scarves in different techniques using different types of felting wool. Wool scraps are very nice to touch and they are totally eco friendly. I first decided to separate them into small piles by their color.

multicolored wool scraps

To make a wool felted brooch I cover a handful of wool scraps with felting wool and felt it in soapy warm water. As a result I get a base for my brooch that pretty much looks like a white pebble stone.

felted wool made of wool scraps

Once the brooch base is ready, I let it dry. Now it's time to turn it into something unique and beautiful. I embroidered a tree of life design adding small glass beads in blue, red and green. It's a great opportunity to use your imagination and come up with something totally different and special!

tree of life folk wool brooch felted from scraps


Sunday, September 9, 2012

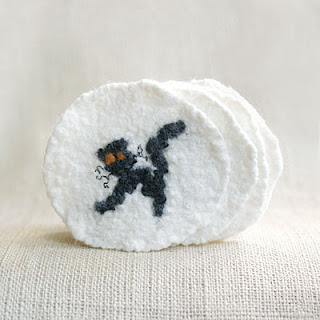
DIY How to make Halloween black cat felted coasters

It is so much fun to decorate your home for Halloween. If you have children it is even more fun as they usually love Halloween and craft projects that go with it. I have come up with an idea of making Halloween themed glass coasters. I already tried scary pumpkins. This time around I'll put a black cat on my coasters.

Halloween black cat coasters

To make felted wool coasters we will need white, black and orange felting wool, water, soap and bubble wrap plastic paper.

On a piece of bubble wrap plastic paper arrange pieces of white felting wool so that they form a circle. You can put one layer of wool for future coasters to be thin or a few layers for them to be thicker. Don't forget that wool will shrink by about 30%. Depending on the size of future coasters add 30% to their original size.

Halloween black cat felting

Once the white circle is there start working on a black cat. Let one piece of black wool be the cat's tail, another - its back. Form a circle out of black wool and make the cat's head. Decorate your cat with additional features like orange eyes, whiskers made of black thread, etc. Use your imagination to make your cat funny, scary or cute! It's important you arrange all the details carefully so that they don't mix up later on.


Once the cat is ready start felting. To felt add soapy water and cover the wool with another layer of bubbled wrap paper. Make sure the original image of the black cat stays as much intact as possible. Start carefully rubbing the plastic paper. Felting shouldn't take long. Once all the wool fibers attach to each other the coaster is ready.


Rinse your coasters well and let them dry overnight. If you wish to make more that one coaster keep in mind that it's almost impossible to completely replicate your original image. You can more or less follow the steps of replicating your original design but at the end all cats will look different. If you love handmade and are ready for all your cats to look special and different go for it!


Sunday, September 2, 2012

DIY How to make Halloween ghost home decoration

Some of us will most probably decorate our homes for Halloween. I would like to share an idea of a DIY project of making felted ghosts for Halloween.


We will need white and black felting wool, a glass to use as a form, soap, water and a piece of bubbled wrap paper.


On a piece of bubbled wrap paper put an empty glass upside down. Slowly start to cover it with white wool. It makes sense to water the surface of the glass beforehand so that our pieces of wool could stick to it. Once the glass is all covered with wool it's time to wet our wool with soapy water. It makes sense to water it slowly so that our wool doesn't fall off the glass and stays there covering it nicely. Once white wool is wet we can start making our ghost's "face".


With a piece of black wool make an eye and attach it to our white ghost. It's much fun to experiment with sized and eye position as our ghost's face expression will change dramatically depending on what shape and size ghost's eyes will be.

Once all the wool pieces are at place we can start the felting process. Carefully wrap bubbled paper around our glass and start rubbing it. Be gentle so that our wool doesn't fall off the glass. Once wool fibers become inseparable and our white form turns into a firm piece of felted wool it's time to rinse it.

To dry it well I let it sit on a glass overnight. Thus, the original form of the glass will be preserved and whet our ghost is nice and dry it will stay firm and round. I've attached a thread on top of it so that I could hang it anywhere in my room or outside. My little white ghost turned out to be not scary at all. But it's all in your own hands. Designing the ghosts face is the most creative part of the whole process!


Wednesday, May 23, 2012

Orange poppy seed cake recipe

While living in New York City we became huge fans of Sweet Melissa cafe located in Carroll Gardens, Brooklyn. It turns out there is a book that has all the recipes of the amazing pastry we used to eat in Sweet Melissa. We couldn't resist buying the book. My husband Andrei is an avid baker. The first recipe from the book he tried was orange poppy seed cake. Coming from Eastern Europe we love pastry with poppy seeds!


To bake the cake we will need:
1 whole orange; 1 cup of sugar; 3 eggs; 12 tablespoons (1 and 1/2 sticks) of welted unsalted butter; 1 and 1/2 cups of all-purpose flour; 2 and 1/4 teaspoons of baking powder; 3/4 teaspoons of salt; 1 tablespoon of poppy seeds

After we bake the cake we will cover it in a glaze. To make the glaze we will need:
2 tablespoons fresh orange juice; 2 tablespoons fresh lemon juice; 1/4 cup sugar


We start with cutting an orange into pieces and removing the stem. In a bowl mix the orange (skin and pulp) pieces with 1/2 cup of sugar until pureed. Make sure no large pieces of orange remain.

In a large bowl whisk together the remaining 1/2 cup of sugar and eggs then add the orange puree and the melted butter. In a separate bowl whisk together the flour, baking powder, salt and poppy seeds. Gently combine both mixtures.


Preheat your oven to 350F.

Pour the mixture into the loaf pan. Bake for 50 - 60 minutes until a wooden skewer inserted into the cake comes out clean. Remove from the pan and let the cake cool.

For the glaze simmer orange juice, lemon juice and sugar in a small saucepan for about 3 minutes. With a pastry brush apply the hot glaze over the cake while the cake is still a bit warm.

Enjoy!


Friday, September 23, 2011

Lemon sponge cake Semifreddo

This lemon sponge cake is great for light desserts' admirers. It has a very saturated but not dominating lemon taste.
The cake was baked by Andrei Utkin with a recipe by David Lebovitz from his book Ready for Dessert.
We will have to cook three separate ingredients for the cake. First we prepare a lemon curd, then a lemon syrup and finally a sponge cake itself.

Ingredients for the lemon curd:
1/2 cup 9125 ml) freshly squeezed lemon juice
1/2 cup (100 g) sugar
6 tablespoons butter
2 large eggs
2 large egg yolks

Ingredients for the lemon syrup:
3/4 cup (180 ml) water
1/3 cup (65 g) sugar
1/4 cup (60 ml) freshly squeezed lemon juice
2 tablespoons kirsch (not required)

Additional Ingredients:
1 cup (250 ml) heavy cream
2/3 cup (75 g) crushed amaretti cookies

lemon curd
In a saucepan combine lemon juice, sugar and butter. Set the saucepan over low heat. In another bowl whisk together the eggs and egg yolks. Pour the egg mixture into the saucepan whisking constantly, until the curd starts to thicken. Don't boil it!
When the curd is ready let it cool and then refrigerate.

To make the lemon syrup warm the water and sugar in a saucepan. When the sugar dissolves remove from the heat, stir in lemon juice and the kirsch. Let it cool completely.
sponge cake
Bake a sponge cake 12 by 18 inch (30 by 46 cm) and cut it in two pieces so that it fits into a baking dish. Whisk the cream until it turns into a whip cream. Mix the whipped cream and the lemon curd.
Put one layer of the sponge cake on the bottom of the baking dish and brush evenly with about 1/2 cup of the lemon syrup. Spread 1/2 of the lemon cream evenly on top of the first cake layer and sprinkle with amaretti crumbs. Lay the second piece of the sponge cake on top and repeat the procedure. The cake is ready. refrigerate until chilled. Sprinkle with the rest of amaretti crumbs before serving.
Lemon sponge cake Semifreddo


Monday, September 12, 2011

Fresh Ginger Cake

This yummy and spicy fresh ginger cake was baked by Andrei Utkin. An inspiration came from David Lebovitz recipes book "Ready for Dessert".

We will need:
4-ounce (115 g) piece fresh ginger, peeled and thinly sliced
1 cup (250 ml) molasses
1 cup (200 g) sugar
1 cup (250 ml) vegetable oil
2 and 1/2 cups (350 g) all-purpose flour
1 teaspoon ground cinnamon
1/2 teaspoon ground cloves
1/2 teaspoon ground black pepper
1 cup (250 ml) water
2 teaspoons baking soda
2 large eggs

ginger cake piece

Preheat the oven to 350 F (175C) and butter a round cake pan.

In a food processor chop the ginger and set it aside. In a large bowl, mix together the molasses, sugar and oil. In a medium bowl, whisk together the flour, cinnamon, cloves and pepper. In a small saucepan, bring the water to a boil, then stir in the baking soda. Whisk the hot water into the molasses mixture, then ass the chopped ginger.
Gradually sift the flour mixture over the molasses mixture, whisking to combine. Add eggs and whisk until thoroughly blended.
a piece of ginger cake
Bake until the top of the case springs back when lightly presses with a finger for about 1 hour.
The cake is moist and will store well for a few days. Enjoy the cake!
fresh ginger cake serving

Tuesday, June 28, 2011

Coconut Macaroons recipe

These yummy and simple to make coconut macaroons were baked by Andrei Utkin. An inspiration came from David Lebovitz recipes book "Ready for Dessert".

You will need:
8 egg whites
2 and 1/2 cups sugar
1/2 teaspoon salt
2 tablespoons honey
5 cups dried unsweetened shredded coconut
1/2 cup all-purpose flour
1 teaspoon vanilla extract

In a large saucepan we mix together egg whites, sugar, salt, honey, coconut, flour and vanilla. We cook the mixture gently over a medium-low heat until the bottom just begins to sizzle. Let the mixture cool a bit.

Preheat the oven to 350 F. Line 2 baking sheets with parchment paper or silicone baking mats. With your fingers form 1 and 1/2 inch pyramids out of the mixture and place them on the baking sheets.

Bake, rotating the baking sheets midway during baking, until the macaroons are evenly deep golden brown, about 20 minutes. Let macaroons cool on the baking sheets.
The recipe makes about 60 macaroons.