We will make a Christmas gift that is an easy and simple DIY project.
We will need a wooden bracelet, a few nail polishes and a roll of masking tape.
The wooden bracelet should be plain wood. Such bracelets could be purchased on-line or in craft shops. I suggest you try it on before starting a project. It would be a disappointment if once you finish painting your bracelet won't fit.

Look at your nail polish collection and select a few nail polishes that match. We will use them as our paint. They are very durable and have a nice luster.
Masking tape will help us paint the pattern we design.

To start apply masking tape to the bracelet. Make sure the tape is adhered well to the wooden bracelet. Otherwise you will have paint spills and the bracelet will look messy. I will paint a pattern of stripes on my bracelet, thus, I'll apply the tape so that there are stripes of untreated wood. I'll leave 4 or 5 untreated wood stripes on my bracelet. Now color wooden stripes with the same hue of nail polish.

Once the polish is dry slowly remove the masking tape. You will see nice colored stripes on the bracelet. Now apply a new set of masking tape to color the bracelet with a new nail polish shade. Repeat as many times as nail polish colors you have.
Make sure the nail polish is dry and the masking tape is adhered well.

I like to mix colors without any rule or pattern, thus, a dark red color may be followed by a golden hue and then by a dark purple one. Then I change the order. I change stripe sizes as well to make my bracelet look special and creative.


Monday, September 30, 2013
Christmas gift ideas
Sunday, June 2, 2013
How to make a new upcycled necklace from an old one
I've recently bought a vintage necklace that looked rather old style and dusty. However, the beads were of high quality and of a very pretty color. They reminded me cranberries of all sizes and shades of red. I decided to upcycle the vintage necklace and turn it into something more contemporary and hip.

First of all I cut the necklace with a help of regular scissors to free up beads. I was lucky that the base of the necklace was a regular cotton thread and not a metal wire.
Beads looked very nice but were a bit dusty. I washed them with soap and left them to dry.

Once dry I put my beads in a glass jar. They looked so pretty with light coming through the jar and making beads shine. Beads are of all shades of red and of different sizes. I decided I won't use metal beads that were originally a part of the necklace. I'll to save them for a later project.

To crochet a new and hip necklace I used a crocheting hook and a super thin light blue thread. The combination of bright red and light blue looked super pretty! For a start I threaded all the beads mixing up sizes and colors. It saved me time and made the process of crocheting a necklace easier.

Having so many beads I was able to crochet a long necklace. It's really great as I'll be able to wear it not only as a necklace but as a bracelet, a belt or a head accessory. I crocheted a simple foundation chain adding red beads about every inch. The necklace crocheting took about 15 minutes. When the necklace was ready I attached a toggle clasp to complete the work.
It looks bright, hip, and very different from the original vintage necklace I bought. The new necklace is a perfect summer accessory! I'm especially happy I could reuse something I already had and turn it into something new.


Monday, December 3, 2012
Giveaway Red Ornament Balls Christmas decoration
I'm hosting my new giveaway. One lucky giveaway participant selected by a random number generator will win a set of eight hand felted red ornament balls of different sizes. Each red felted ball has a thread and could be an ideal Christmas tree decoration. To read more about hand felted Christmas balls please go to my CityCrochet shop.

The giveaway's last day is Tuesday, December 11th.
To enter: Please visit my CityCrochet shop and leave a comment below about any item(s) you really like. Don't forget to leave your contact information (e-mail address, Facebook, Twitter, Pinterest) so I can contact you in case you win. Your info will NEVER be used for any other purposes!!!
Extra entries: Please leave one separate comment for each extra entry following the instructions below.
Open to US and Canada only. Winner will be chosen by online random generator. The winner has 3 days to reply or another winner will be chosen.
Good luck!:)
a Rafflecopter giveaway

Friday, October 19, 2012
DIY How to make a Christmas tree decoration
It's about time to start thinking about Christmas gifts and home decoration ideas. If you plan on having a Christmas tree it's a great time to make an ornament for your tree with your own hands. It will be a small gift for your Christmas tree. I hand felt home decoration items and am happy to share how to create a simple Christmas tree ornament.

You will need a plastic ball and felting wool of different colors. For felting you will need plastic wrap paper, water and soap. To complete your ornament you will need a needle and a thread.

To make the ornament cover the plastic ball with layers of white felting wool. Make a pattern you wish to have on the ball by adding small pieces of dyed wool here and there. Colors that work well for Christmas include red, green, brown. Once your wool is layered wet the ball with soapy water and cover with plastic wrap.

Start felting by pressing and caressing the wrapped ball. Be careful not to mess up the original pattern. You will always be able to fix it at the early stages of felting before the wool felts completely. Add water and soap if needed. Continue felting until the wool attaches well to the ball and all the design details are firmly felted in.

Rinse the ball in fresh water and gently squeeze the ball to get rid of extra water. Let it dry overnight. Once your ball is nice and dry attach a thread to the ball. You can glue the thread or if you want it to be more eco friendly make a whole in the ball to let the thread through. Thus, you won't need to use any glue.
Happy crafting!

Monday, October 15, 2012
Red maple leaf giveaway results
Red maple leaf felted mini bag GIVEAWAY ended on Friday, October 12th. Thank you so much for participating! I very much appreciate your time and attention!

Congratulations to Marty for winning my giveaway!!!

Wednesday, October 3, 2012
Giveaway Red Maple Leaf felted mini bag
I'm hosting my second giveaway this year. It's my tribute to the beautiful autumn! One lucky giveaway participant selected by a random number generator will win my hand felted Red Maple Leaf mini bag. I hand felted this mini bag of wool in white, red, burgundy, cherry. No glues, dyes or artificial materials have been used. To read more about the mini bag please go to my CityCrochet shop.

The giveaway ends on Friday, October 12th. The winner will be announced next Saturday, October 13th.
To enter:
Please visit my CityCrochet shop and leave a comment here about any item(s) you really like. Don't forget to leave your contact information (e-mail address, Facebook, Twitter, Pinterest) so I can contact you in case you win. Your info will NEVER be used for any other purposes!!!
Extra entries:
Please leave one separate comment for each extra entry following the instructions below.
Open to US and Canada only. Winner will be chosen by online random generator. Winner will be notified by Saturday, October 13th and will have 3 days to reply or another winner will be chosen.
Thank you and Good luck!:)

a Rafflecopter giveaway
Monday, October 1, 2012
Red Berry felted mini bag GIVEAWAY results
Red Berry felted mini bag GIVEAWAY ended on Friday, September 28th.
Thank you so much for participating! I very much appreciate your time and attention!
I ran the number of comments through the Random Generator website

Let us congratulate Marija who won my Red Berry felted mini bag with a button and a long strap!
Congratulations Marija!!!

Friday, September 21, 2012
Giveaway Red Berry hand felted mini bag
To celebrate this beautiful autumn I'm hosting my first giveaway this year. One lucky giveaway participant selected by True Random Number Generator will win my hand felted Red Berry mini bag. I hand felted this mini bag of wool in white, red, burgundy, green and brown. No glues, dyes or artificial materials were used. To read more about the mini bag please go to my CityCrochet shop.

The winner will be announced next Friday, September 28th.
To enter:
Please visit my CityCrochet shop and leave a comment here about any item(s) you really like. Don't forget to leave
your contact information (e-mail address, Facebook, Twitter, Pinterest) so I can contact you in case you win. Your info will NEVER be used for any other purposes!!!
Extra entries:
Please leave one separate comment for each extra entry. (So if it is 2 extra entries for example, please leave 2 comments, etc.)
1 entry - follow my blog with Google friend connect
1 entry - Like my Facebook page
1 entry - Like this post (just press the Like button under this post)
1 entry - follow me on Twitter TonyaUtkina
1 entry - follow me on Pinterest
1 entry - repin this post (just press "Pin It" button under this post)
2 entries - grab my button and put it on your blog
No purchase is neccessary, but if you happen to buy something from my shop you will get extra 5 entries.
Open to US and Canada only. Winner will be chosen by online random generator. Winner will be notified by Friday, September 29th and will have 3 days to reply or another winner will be chosen.
Good luck!:)

Thursday, September 20, 2012
DIY How to make felted wool mini bag
We are surrounded by bright and colorful autumn leaves and berries. Fall is such a beautiful season! It would be nice to make a vivid Fall accessory to remind us of these amazing few months. I've created this mini bag using felting wool of different colors. Red berries look a bit like bright mountain ash berries in the Fall.
My Giveaway: Red Berry felted mini bag

To make a hand felted mini bag you will need white wool, water, soap and bubble wrap paper. To create a picture design on your pouch it would be great to have additional feting wool of different colors. For a strap you can always use a rope or hand crochet one of a white cotton thread.

As the very first step cut out a rectangular piece of bubble wrap paper. You will use the rectangular piece to create your mini bag. Depending on the desired size of your future mini bag increase the size of the cut out by about 30%. Do not forget that wool will shrink as a result of felting.

On a large piece of bubble wrap paper arrange pieces of white wool to form a rectangle. The size of the wool rectangle should be a bit bigger than the size of the plastic cut out. Lay out at least two layers of wool on top of each other for your mini bag to turn out firm and durable.
On top of the white wool rectangle put your plastic cut out. The wool rectangle should be slightly bigger than the cut out. You will use that extra wool to form bag's sides. On top of the plastic rectangle lay white wool. You will get a wool rectangle with a plastic cut out inside.

Wet the wool with soapy water. Bend white wool on both sides and at the bottom to form a bag. Cover the wool with a large piece of bubble wrap paper and start carefully rubbing the plastic paper.
To make a picture design arrange pieces of dyed wool into a desired design and cover with a large piece of bubble wrap paper. Felt until the wool fibers attach and form a firm and homogeneous piece. Rinse your rectangular piece well and let it dry overnight.
To turn you felted rectangular piece into a mini bag attach a button or hand felted bead and a strap. To make it easy use a rope as a strap.


Monday, September 17, 2012
Autumn butterfly
Autumn is upon us! With very few bushes still in bloom we see less and less of beautiful butterflies. They will be all gone pretty soon. I took a picture of this beautiful butterfly in our front yard. It will help me remember warm days and beautiful colors of autumn!


Wednesday, September 12, 2012
Hand embroidered jewelry by Skrynka
Many countries have deeply routed traditions of folk music, art and dance. It's amazing to look into how people used to live centuries ago and how they tried to make their lives bright and beautiful by decorating their homes with traditional ornaments. I find Eastern European folk art quite unique and inspiring. I've recently come across a fantastic artist Natalka of Skrynka who creates distinctive and beautiful hand embroidered and cross stitched jewelry and home decor pieces.

Could you please tell us a bit about yourself?
My name is Natalka. I live in Ukraine. I've been sewing, knitting and hand making items since I was a child. However, embroidery is my main passion. I may occasionally fall in love with a different technique or fiber but I always come back to my main obsession which is embroidery and cross stitching.
I'm a mom of a 2 years old and try to share time between my family and my business of making folk inspired jewelry. I dream about developing my business into something feasible one day. I would love to travel, see the world together with my family or even move to a place next to the sea. It's all in the plans for now. I hope one day I'll be able to combine my dreams and aspirations with my business and family life.

How did you start?
I started embroidering and cross stitching when I was a small child. I used to embroider large images but my true passion was always unique Ukrainian folk ornaments and patterns. I dreamed about combining folk embroidery with contemporary art and craft.
Soon after I had my son I decided it's time to turn my hobby into a business. I started making cross stitched jewelry and home decor items. Most importantly people like what I create. It's such a great pleasure to make items that actually inspire other people and make them happy.

What are your main sources of inspiration?
My main source of inspiration is traditional Ukrainian ornaments and patterns. I collect pictures of old traditional folk dresses such as blouses, skirts, festive towels, etc. I often visit our local museum of ornamental and folk art. I also collect books about old and traditional home decorations, designs and Ukrainian medieval clothes.
Each region has its own distinctive patterns and colors. I've noticed that nations living on different continents sometimes have somewhat similar ornaments and patterns. I keep finding similarities between Ukrainian folk embroidery and embroidery of native Americans and Mexicans.

What fibers do you work with?
I mostly work with natural and eco friendly fibers. I prefer to work with linen fabrics, wool felt and rarely with eco-friendly manufactured felt. To create my jewelry pieces I use lead-free and nickel-free jewelry making supplies. I take it seriously and have an equipment set up at home to check levels of different metals in my supplies. It's always better to double-check suppliers and make sure items I use for jewelry making are lead and nickel free.
I myself have very sensitive ears and, thus, always use only non-sensitizing ear hooks for my earrings.

Our planet is suffering from over development and over use. I believe that we should all be concerned about the future of our planet. Even small improvements we could do to make our life more eco-friendly will benefit our planet and us as a result. I strongly believe that by buying hand made items people not only get high quality and unique things made with love but help individual artists and their families to keep their creative process alife. It makes a big difference for everyone!

Friday, September 7, 2012
DIY How to make a maple leaf brooch
Let us make a felted brooch in a shape of a maple tree leaf. Autumn will be here before we know it. Fall inspired accessories will look great on our coats and outerwear. The maple leaf brooch is relatively easy to make. You will need a table to put a piece of bubbled wrap paper. It's great if the table's surface can endure water and soap as with felting you will get your table wet.
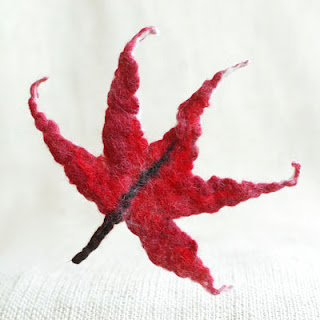
You will need felting wool in red, burgundy and brown. For felting you will need soap, water and bubbled wrap paper.

On a piece of bubbles paper arrange five pieces of burgundy red felting wool. They will be our maple leaves. In the middle add a piece of brown wool. To add color put a few small pieces of bright red wool here and there. I suggest you experiment with colors and add a bit of green, black, dark brown or ever blue. Colors will add volume to the leaf and make it look bright.

Once the leaf is arranged wet it with soapy water and cover with another piece of bubbled wrap. Start gently rubbing the plastic paper. The leaf is felted when all the wool fibers stay intact and attached to each other.

The brooch is almost ready. Rinse it well in water and let it dry. Attach a safe pin at the back of the leaf to turn it into a brooch. You can wear this brooch with pretty much any outfit. It will look great on winter coats and outerwear.


Monday, May 21, 2012
DIY How to make felted watermelon earrings
To make bright and happy summer inspired watermelon earrings we will need felting wool in bright red, green, white and black, soap, pure water and bubbled wrap paper.

To make a watermelon we will need to lay out wool in a shape of “hot dog”. First we cut a piece of red wool of about 5 inch. We mix red wood with a bit of black wool to make it look like our watermelon has seeds. On top of red wool we lay white and than green wool. As a result we will have a green wool “hot dog” that inside will have red, black and white wool.

Once our “hot dog” is formed we wet is with water and soak it in soap. As it gets wet and soapy we start rolling in on a piece of bubbled wrap. We roll it on a plastic wrap for about 15 minutes until it gets firm. The wool will shrink by about 30%. Let our felted piece dry well.

Our next step will be to cup our “hot dog” into equal parts. You can cut it with scissors. As a result we will get round pieces of felted wool that will look like freshly cut watermelon. If you attach pieces of felted watermelon to simple earrings hooks you will get nice and fresh watermelon earrings.

The watermelon earrings look fun and bright. They will be a truly hand made item as I doubt you can buy anything like that in a jewelry store. The fact that you've created them with your own hands will make watermelon earring even more special.


