Many thanks to my Secret Santas!
I've received totally amazing gifts from two wonderful Artists.
a set of Holiday Napkins from Keri of Too Cute customs crafts

Keri also sent me these amazing earrings by BlueberryCream made of corrugated copper

My next Secret Santa gift came from Elizabeth Urquhart of Pure Nature Photos

All these wonderful gifts will make my home happy:)
Thank you so much!!!
Monday, December 10, 2012
Secret Santa gifts
Monday, October 1, 2012
Red Berry felted mini bag GIVEAWAY results
Red Berry felted mini bag GIVEAWAY ended on Friday, September 28th.
Thank you so much for participating! I very much appreciate your time and attention!
I ran the number of comments through the Random Generator website

Let us congratulate Marija who won my Red Berry felted mini bag with a button and a long strap!
Congratulations Marija!!!

Friday, September 21, 2012
Giveaway Red Berry hand felted mini bag
To celebrate this beautiful autumn I'm hosting my first giveaway this year. One lucky giveaway participant selected by True Random Number Generator will win my hand felted Red Berry mini bag. I hand felted this mini bag of wool in white, red, burgundy, green and brown. No glues, dyes or artificial materials were used. To read more about the mini bag please go to my CityCrochet shop.

The winner will be announced next Friday, September 28th.
To enter:
Please visit my CityCrochet shop and leave a comment here about any item(s) you really like. Don't forget to leave
your contact information (e-mail address, Facebook, Twitter, Pinterest) so I can contact you in case you win. Your info will NEVER be used for any other purposes!!!
Extra entries:
Please leave one separate comment for each extra entry. (So if it is 2 extra entries for example, please leave 2 comments, etc.)
1 entry - follow my blog with Google friend connect
1 entry - Like my Facebook page
1 entry - Like this post (just press the Like button under this post)
1 entry - follow me on Twitter TonyaUtkina
1 entry - follow me on Pinterest
1 entry - repin this post (just press "Pin It" button under this post)
2 entries - grab my button and put it on your blog
No purchase is neccessary, but if you happen to buy something from my shop you will get extra 5 entries.
Open to US and Canada only. Winner will be chosen by online random generator. Winner will be notified by Friday, September 29th and will have 3 days to reply or another winner will be chosen.
Good luck!:)

Thursday, September 20, 2012
DIY How to make felted wool mini bag
We are surrounded by bright and colorful autumn leaves and berries. Fall is such a beautiful season! It would be nice to make a vivid Fall accessory to remind us of these amazing few months. I've created this mini bag using felting wool of different colors. Red berries look a bit like bright mountain ash berries in the Fall.
My Giveaway: Red Berry felted mini bag

To make a hand felted mini bag you will need white wool, water, soap and bubble wrap paper. To create a picture design on your pouch it would be great to have additional feting wool of different colors. For a strap you can always use a rope or hand crochet one of a white cotton thread.

As the very first step cut out a rectangular piece of bubble wrap paper. You will use the rectangular piece to create your mini bag. Depending on the desired size of your future mini bag increase the size of the cut out by about 30%. Do not forget that wool will shrink as a result of felting.

On a large piece of bubble wrap paper arrange pieces of white wool to form a rectangle. The size of the wool rectangle should be a bit bigger than the size of the plastic cut out. Lay out at least two layers of wool on top of each other for your mini bag to turn out firm and durable.
On top of the white wool rectangle put your plastic cut out. The wool rectangle should be slightly bigger than the cut out. You will use that extra wool to form bag's sides. On top of the plastic rectangle lay white wool. You will get a wool rectangle with a plastic cut out inside.

Wet the wool with soapy water. Bend white wool on both sides and at the bottom to form a bag. Cover the wool with a large piece of bubble wrap paper and start carefully rubbing the plastic paper.
To make a picture design arrange pieces of dyed wool into a desired design and cover with a large piece of bubble wrap paper. Felt until the wool fibers attach and form a firm and homogeneous piece. Rinse your rectangular piece well and let it dry overnight.
To turn you felted rectangular piece into a mini bag attach a button or hand felted bead and a strap. To make it easy use a rope as a strap.


Friday, June 8, 2012
Nursing teething crocheted necklaces by Julia Ermakovich
I came across teething and nursing crocheted necklaces looking for a baby shower gift for a friend. What a great idea! These necklaces are made of natural materials and I especially like the combination of plain wooden beads and crochet. Julia Ermakovich is an artist who creates bright and happy necklaces to entertain moms and their babies. I’m glad I had a chance to talk to her and ask her a few questions about herself and her art of making nursing necklaces.

Can you please tell us a bit about yourself?
I live in Moscow, Russia. Up until recently I’ve been working in a bank full time and had limited time for my family and my crocheting business. A month ago I quit and am now fully engaged in developing my business and enjoying my family and friends. So it’s all about crocheting now.

How did you start?
As long as I remember myself I’ve always been knitting and crocheting. First it was making items for my dolls and later for myself and my friends. Some 7 or 8 years ago reading a fashion magazine I came across pictures of crocheted necklaces. I decided to try as necklaces looked super stylish and cool. Besides it’s much easier to crochet a necklace than a man’s sweater!
It took me some time to figure our the technique and come up with the right design though. I started with making necklaces for my girl friends as gifts. People started taking about my necklaces and I got my first custom orders. It was great as with money earned through sales I could by more supplies and afford to try new materials and techniques.
About four years ago a friend of mine asked me to make her a necklace that would color match a sling and a baby carrier for her new born baby. Thus, a nursing and teething necklace was born!

What inspires you?
I make a lot of customs orders and my clients often share their ideas and designs with me. My clients' fantasy and imagination is unbelievable. They inspire me to create new designs and come up with new color patterns.
I’m a very eco conscious person and I am always looking for new eco-friendly materials that I could use in my nursing necklaces. There are so many products that are made of organic and natural fibers that we don’t know much about! Every time I come across a new fabric or a new fiber I feel a need to incorporate them into my designs. I’ve recently discovered buttons made of coconuts. They look great and are very nice to handle!

What are you most popular items?
It all depends on what group of my clients we are talking about. Sometimes young moms are looking for something to wear every day. I make them necklaces of neutral color combinations that are less flashy and bright.
If my clients are looking for something to entertain their babies with I make necklaces bright and happy. I can add a crocheted animal or a wooden ring to make the necklace more attractive for a child.
Thank you, Julia!

Monday, June 4, 2012
GIY Tutorial How to make felted bracelet with buttons
I still have some buttons left from my crocheting adventure. I don’t like nice items to rest idle on my working table in my studio so I came up with an idea of a felted bracelet with buttons.
To make the bracelet we will need undyed felting wool, buttons of different colors and sizes, bubble plastic wrap, a needle and a white thread.

I first started with felting a bracelet. If you don't feel like felting today you can always buy a prefelted wool in any of craft and supplies stores. If you decide to go with a prefelted piece just cut a rectangle shaped piece out of a prefelted wool. The measurements could be about 2 and ½ inch by 9 and ½ inch.

I prefer to felt a bracelet myself as, thus, I’m able to make it as soft and thin as I wish.
On a bubble wrap piece of paper I lay out pieces of wool to form a rectangle. The rectangle will later turn into the bracelet. Since the wool will shrink I make the rectangle about 30% bigger that the original size. I’ll go with about 3 and ½ inch by 12 inch shape this time.

Once the rectangle is formed I wet it with clear water and add soap. Liquid soap should be fine. Once the piece is all wet and soapy I cover it with the rest of bubble plastic paper and start the process of felting. I stroke and rub the plastic helping wool fibers to bind and felt. When the wool has felted I rinse my bracelet in clear water and let it dry completely.

On my bracelet I lay out buttons of different sizes and colors. I can color coordinate them and add some extra buttons here and there for the pattern to look the way I want it to be.
I sew on buttons one by one with a needle and white thread. It makes sense to sew largest buttons first. It will help you preserve the original pattern and distribute buttons evenly on the bracelet.

Once all the buttons are on the bracelet it’s time to make a snap. One of the buttons can easily be used as a snap. Just make a cut on the opposite side of the bracelet for the button to fit in.
The bracelet looks bright and unique! It can be a great gift for someone who loves buttons. One can always substitute simple buttons with vintage ones or use dyed wool instead of white one as a base.
Happy crafting!

Wednesday, May 16, 2012
DIY How to make city style felted bracelet
The color combination of pure white and brown is my favorite. Accessories in white and dark chocolate look stylish and classy. They go well with business or casual outfits.

To create a bracelet we will need felting wool in white and brown and wooden beads. We will also need a piece of bubbled plastic wrap paper, soap and clear water.

I first start with felting a white bracelet. On a bubble wrap piece of paper I lay out pieces of wool to form a rectangle. The rectangle will later turn into the bracelet. Since the wool will shrink I make the rectangle about 30% bigger that the original size.
Once the rectangle is formed I wet it with clear water and add soap. Once the piece is all wet and soapy I cover it with the rest of bubble plastic paper and start the process of felting. I stroke and rub the plastic helping wool fibers to bind and felt.
When the wool has felted well I rinse my bracelet in clear water and let it dry completely. With a piece of brown wool I make a felted bead by rolling a wetted and soapy piece of brown wool between my palms.
Once my bracelet is ready I needle down brown wooden beads. The color of wooden beads matches the color of the brown felted bead nicely!

The bracelet turned out to be very soft, thin and light. It's made of all natural materials and is very pleasant to wear. The felting technique is very eco-friendly as to felt an item one just needs some water and a bit of soap. No chemicals are used in the process of felting. To wear the bracelet one simply has to fasten the brown button.

Saturday, July 2, 2011
Summer Wedding Essentials contest results
Russian Artists team on Etsy just had its Summer Wedding Essentials contest. Fifty six team shops took part in the contest submitting their hand made wedding-themed items. All of the entries were fantastic! They can be checked out at Russian Artists Facebook Page.
Although all of the items submitted were amazingly beautiful, creative and unique, I picked up a few of my personal favorites. All of the wonderful items presented will make any wedding an unforgettable experience!
1. Dog Crochet Wedding Floral Collar by mailo
2. Event Decor for the Wine Glass by MamaTita
3. Tea Set, Original decorative painting by Yury Tarler
4. White earrings with pearls by HoneyCase2
Wednesday, June 15, 2011
Water lily felted flower brooch in purple violet
Flowers come in different shapes and colors. The diversity of nature always inspires me. This time I've decided to make a felted flower brooch that will look like a water lily.
First of all I hand felted a large number of purple colored wool pieces in shapes of flower petals. I tried to make my petals long and somewhat narrow. At first I planned on making two-colored flower brooch and hand felted pieces of white wool as well. Later I changed my mind and created a purple colored brooch adding a few white shiny beads instead.
After my wool petals dried up I started arranging them into different patterns to find the one I liked the most. It's easy to do it while they are not yet attached and turned into an actual brooch. It's always fun to lay out different designs with different pieces of felted wool.
After a while I figured out what exactly I wanted to do with my wool. I attached all my numerous purple colored felted wool pieces to a hand crocheted base. To accent the color I added tiny white beads that look like small flower stamen.
The brooch is ready to wear now!
Thursday, June 2, 2011
Blue and chocolate felted flower brooch
I continue experimenting with hand dyeing. It's such a fun process and I just love the colors that turn out at the end. To create my chocolate blue flower felted brooch I first hand felted flower petals in white and dark brown. I had all three types of wool available at home.
To add color to my brooch I hand dyed each felted petal with blue drink mix which contains food coloring. As the result my petals have spots of bright blue to contrast their dark brown color and they smell like raspberry. My pieces of hand felted wool look so different now. Bright blue color makes them vivid and summer-like.
After assembling all my hand dyed pieces into a flower and attaching petals to a hand crocheted jute base I've got an exotic flower brooch in blue, dark brown and white. It will go well with any neutral or white outfit and will add color to a business casual dress.
Wednesday, June 1, 2011
Summer suncatcher by FleetingStillness
I've recently received an amazing gift from a very talented stained glass artist FleetingStillness who lives and works in Maryland.
It's always nice to receive gifts from fellow artists who are members of vast and diverse hand made community. When such gifts turn out to be beautiful hand made pieces of art it's twice as nice!
I always had a soft spot for pieces made of glass. I praise glass for its transparency, variety of colors and opportunities for creativity. The suncatcher I've got is made of bright yellow and blue glass and a copper foil. It was created in a "Tiffany" style meaning no lead was used to attach pieces of glass. 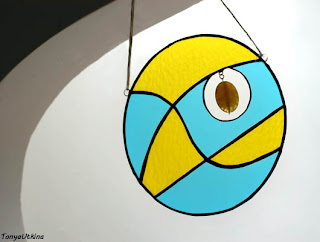
The suncatcher is a perfect summer gift. The sun shines through brightly colored glass lighting up everything around and making me happy! Yellow and blue colors are of the warm sea, sand beaches and vacations! This piece of art will always remind me of the summer. From now on I'll have a small part of an ocean beach in my room.
Alla, thank you for such a great gift!
Friday, May 27, 2011
Flower brooch hand dyed in burgundy
I keep experimenting with hand dyeing. It's such a rewarding and inspiring process. So many new ideas come to life when one starts mixing colors. The end result is always a surprise and the whole process is much fun!
I hand felted many many wool petals for my flower brooches and dyed them in my freshest color mix. The final dye color is more like a burgundy with hints of red and even yellow. It's such an interesting color that is not eye popping bright but rather stylish and elegant.
I've assembled my petals into a flower brooch with a hand crocheted jute base that I had made earlier. The brooch looks like a flower and will no doubt decorate any outfit. It will go well with any office neutral colors especially the ones with hues of light green, dusty pink and pale blue.
Friday, April 15, 2011
Fresh Spring Flowers in Lavender and Violet
I saw those beautiful flowers on a bush near my house. The bush has just started to bloom and is covered with lavender violet colored tender and fragile flowers. It's such a short period when all those flowers are out to make us happy. I try to carry my camera with me all the time.
Flowers inspire me to create earrings, necklaces and bracelets. I like to work with silver plated wire as it enables me to make twisted designs reminiscent of beautiful vintage smith craft and metalwork that one still occasionally come by at an antique shows nowadays.
Thursday, April 14, 2011
Bright red spring flowers and jewelry
On my way back home I picked up a few beautiful red flowers. They look a bit like roses but have no scent at all. I just finished creating my new red earrings and those flowers were a great match in terms of color and shape. Assembled next to each other both flowers and my earrings look bright and juicy.
The red clear beads I used for creating the earrings are made in Czech Republic. They are of a very interesting cut and look rather like huge rubies. I totally fell in love with them and will spend next few weeks thinking about other designs I could incorporate them in.
Wednesday, March 30, 2011
Red Berry summer bracelet
I love bright colors of the summer: red as a berry, blue as the sky or the ocean, yellow as a sunflower. They bring so much positive energy and create a happy attitude. Besides we usually wear bright and airy dresses in the summer and it's always nice to complement them with equally vivid accessories. Bracelets are wonderful additions to any outfit as they are non-distractive and easy to wear. One can put a few of them to experiment and mix of colors. 
I usually make my bracelets of wire and Czech glass beads. I should admit the Czech beads are the best as they are of very good quality and come in huge selection of shapes and colors. This time I created bright red berry bracelet that looks fantastic on one's hand. It's not flashy but stylish, elegant and fits one's hand just perfectly. It could be a great wedding accessory or something a woman or a girl could wear every day.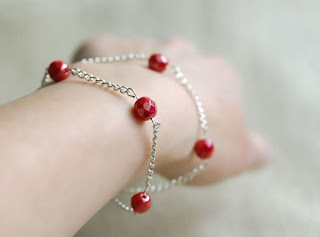
Subscribe to:
Posts (Atom)

