Many thanks to my Secret Santas!
I've received totally amazing gifts from two wonderful Artists.
a set of Holiday Napkins from Keri of Too Cute customs crafts

Keri also sent me these amazing earrings by BlueberryCream made of corrugated copper

My next Secret Santa gift came from Elizabeth Urquhart of Pure Nature Photos

All these wonderful gifts will make my home happy:)
Thank you so much!!!
Monday, December 10, 2012
Secret Santa gifts
Sunday, September 9, 2012
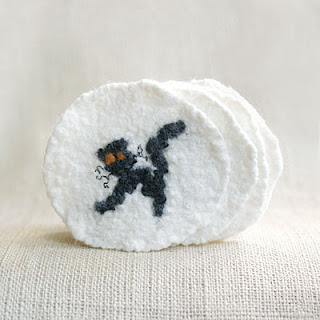
DIY How to make Halloween black cat felted coasters
It is so much fun to decorate your home for Halloween. If you have children it is even more fun as they usually love Halloween and craft projects that go with it. I have come up with an idea of making Halloween themed glass coasters. I already tried scary pumpkins. This time around I'll put a black cat on my coasters.
To make felted wool coasters we will need white, black and orange felting wool, water, soap and bubble wrap plastic paper.
On a piece of bubble wrap plastic paper arrange pieces of white felting wool so that they form a circle. You can put one layer of wool for future coasters to be thin or a few layers for them to be thicker. Don't forget that wool will shrink by about 30%. Depending on the size of future coasters add 30% to their original size.

Once the white circle is there start working on a black cat. Let one piece of black wool be the cat's tail, another - its back. Form a circle out of black wool and make the cat's head. Decorate your cat with additional features like orange eyes, whiskers made of black thread, etc. Use your imagination to make your cat funny, scary or cute! It's important you arrange all the details carefully so that they don't mix up later on.

Once the cat is ready start felting. To felt add soapy water and cover the wool with another layer of bubbled wrap paper. Make sure the original image of the black cat stays as much intact as possible. Start carefully rubbing the plastic paper. Felting shouldn't take long. Once all the wool fibers attach to each other the coaster is ready.

Rinse your coasters well and let them dry overnight. If you wish to make more that one coaster keep in mind that it's almost impossible to completely replicate your original image. You can more or less follow the steps of replicating your original design but at the end all cats will look different. If you love handmade and are ready for all your cats to look special and different go for it!


Monday, June 4, 2012
GIY Tutorial How to make felted bracelet with buttons
I still have some buttons left from my crocheting adventure. I don’t like nice items to rest idle on my working table in my studio so I came up with an idea of a felted bracelet with buttons.
To make the bracelet we will need undyed felting wool, buttons of different colors and sizes, bubble plastic wrap, a needle and a white thread.

I first started with felting a bracelet. If you don't feel like felting today you can always buy a prefelted wool in any of craft and supplies stores. If you decide to go with a prefelted piece just cut a rectangle shaped piece out of a prefelted wool. The measurements could be about 2 and ½ inch by 9 and ½ inch.

I prefer to felt a bracelet myself as, thus, I’m able to make it as soft and thin as I wish.
On a bubble wrap piece of paper I lay out pieces of wool to form a rectangle. The rectangle will later turn into the bracelet. Since the wool will shrink I make the rectangle about 30% bigger that the original size. I’ll go with about 3 and ½ inch by 12 inch shape this time.

Once the rectangle is formed I wet it with clear water and add soap. Liquid soap should be fine. Once the piece is all wet and soapy I cover it with the rest of bubble plastic paper and start the process of felting. I stroke and rub the plastic helping wool fibers to bind and felt. When the wool has felted I rinse my bracelet in clear water and let it dry completely.

On my bracelet I lay out buttons of different sizes and colors. I can color coordinate them and add some extra buttons here and there for the pattern to look the way I want it to be.
I sew on buttons one by one with a needle and white thread. It makes sense to sew largest buttons first. It will help you preserve the original pattern and distribute buttons evenly on the bracelet.

Once all the buttons are on the bracelet it’s time to make a snap. One of the buttons can easily be used as a snap. Just make a cut on the opposite side of the bracelet for the button to fit in.
The bracelet looks bright and unique! It can be a great gift for someone who loves buttons. One can always substitute simple buttons with vintage ones or use dyed wool instead of white one as a base.
Happy crafting!

Subscribe to:
Posts (Atom)

